Posted on

Free Quilt Pattern Alert! Super easy I Spy Quilt pattern to ease your pain on long road trips with the kids

How many times have you been in the car, loaded up the kids to go to grandma’s house, and heard that horrible, awful question…(queue the Jaws music)…”Are we there yet?”  or better yet…”I’m Boooooooored.”  

I Spy Quilt loaded up and ready to go!

I know we’re all super busy in the summer, and it makes finding time to sew pretty difficult.  But now you have a great reason to bust out the sewing machine–you’re going to cure the kids of their road trip boredom by making them an I Spy Quilt!  All you really need are some random novelty prints or scraps–even seasonal fabrics are great for this.  The great thing about this quilt is that NONE of the fabrics need to be cohesive for this to work.  You have a print with elephants?  Elves?  Pirates?  Cactus?  Ballerinas?  They’re all perfect!  The more random the assortment of your fabrics, the longer the kids will be staring at this quilt, absolutely stumped.  

Your layout can be totally random, too!  I tried to lay my squares out from dark to light,
but you can try grouping them by color, theme, etc.  


I had the privilege of teaming up with Janome to write this tutorial for American Quilter’s Society.  So follow this pretty little LINK and head over to get the skinny on how to put this awesome little lifesaver together!  

I quilted mine with some sweet little swirls that were fast and easy!  

Okay, so in all honesty, making this quilt won’t be the end of you ever hearing those two comments from the back seat again, but what the heck!  It’s worth a shot isn’t it?  ðŸ˜‰

Posted on

Couching tutorial

Decorative stitches with a 3-way cording foot 

I had absolutely no idea what couching was when I first heard of it.  I saw a demonstration of couching on a longarm quilting machine, and then very quickly wrote it off (since I didn’t have a longarm at the time), thinking I would never have the means or opportunity to try couching.  You can use couching to emphasize a print on fabric, outline applique, doodle with it, and you can even quilt with it.  

Couching can add a little flair to regular fabric


Well, there are some ways that you can couch without buying a super expensive longarm quilting machine, and then also buying a super expensive couching attachment for said longarm.  You can actually couch by hand–but it takes a while.  And you can certainly try couching by using a domestic sewing machine.  You don’t even have to buy a special foot for it if you don’t want to.  As long as you have a free motion quilting foot that has some sort of round part that the needle goes through, you’re good!  I will say, that if the hole for the free motion foot is really big, you can easily modify it yourself by taking a small piece of scotch tape and covering a portion of the hole (not a portion the needle will travel through).  The smaller the hole on the free motion (or couching) foot, the easier it will be for the yarn to travel where you want it to go.

Make an art piece using couching techniques if that floats your boat!

I wrote a super easy to follow couching tutorial for Janome’s website that can be accessed HERE
So click it and check out how easy couching is!  There are seriously so many things you can do with couching to spice up existing projects.  

Posted on

Scrappy Trip Quilt Project with the San Antonio MQG

Have you ever felt sort of isolated in this “hobby” (or lifestyle to be more accurate) that we call quilting?  I had recently discovered modern quilting and realized there was this whole other world of people that were just like me.  I’m sure we’ve all had a point in our lives where we thought Joann’s and Hobby Lobby were the only places you could buy fabric…I went through this phase for probably the first year and a half that I was discovering sewing (disastrous, I know!).  Once my eyes were opened (along with my pocket book), I needed to connect with other people that felt there was something more than just traditional quilting and subdued fabric.  

I found the San Antonio Modern Quilt Guild really by accident when I was trying to register for QuiltCon 2015.   I immediately joined and have missed just a handful of meetings due to my “real job”, but the experience has been nothing short of life changing.  I have made friends and contacts that have enriched my life so much.

We followed the tutorial posted on Quiltville’s blog here: Quiltville’s blog 
You should check it out if you’re interested in making your own Scrappy Trip quilt–the instructions are very well written and easy to follow.

Some of the guild members have started the journey of the “scrappy trip along”.  It’s really a cool technique to learn, and since we all have a bit of a competitive nature, there are prizes involved and a schedule for block completion.   

Somewhere along the way…I got caught up and ended up with 100 completed blocks.  

This was my starting point when I began cutting 2.5″ wide strips to arrange into blocks.  I obviously like very bright, saturated colors 🙂

My only plan for arrangement was to alternate bright, lighter colors with dark, duller colors.  I wanted a very busy, random quilt when I was done with it.

I think the scrappy trip quilt is an awesome project when you are feeling less than inspired and maybe lost your sew-jo, but need to find it.  Especially if you are doing a random arrangement, where you allow the fabrics to just do their own thing and speak for themselves.  It can be a relaxing project to just piece without thinking and enjoy the results and the process involved.  (It is kind of a lengthy process!)

These are some of my finished blocks (before sewn into the quilt, they measure 12.5″ x 12.5″), and I just love the brightness of them.  

And this is the first layout I set prior to piecing my quilt top.  So many times, we face difficult decisions with all the “favorite” fabrics we buy and not having fabrics to coordinate with them. In the scrappy trip, anything goes, and you don’t have to concern yourself with that.  

I ended up with 100 completed blocks…I kind of got wrapped up in the cutting strips, sewing together, cutting, seam ripping, sewing process and forgot that my intention was not to make a king sized quilt…My final layout was a 9 x 10 layout with the finished top measuring 120″ wide x 108″ long.  This was perfect for our bed since we have a little bit of a problem with cover thievery, and allowed for enough of a drop on both sides that neither my husband nor I end up without covers in the middle of the night.  I had 10 blocks leftover and pieced them all together in a 2 x 5 arrangement.  Then I cut them in half in the center of the middle block so they each measured 25″ x 31″.  I put batting behind each one and quilted these so we would have semi-matching pillow shams.  

I will say that I wanted to go nuts quilting this.  But with those super busy fabrics, I knew the quilting wouldn’t really be showcased, so any intricacy would be lost on anyone but me.  I went ahead and did some cool swirls that took me much longer than I should have spent, but I really had fun with it.  If you’re a beginner quilter, this would be a great project to really push your quilting skills, because any mistakes you make won’t show like a sore thumb.  


So, if you’re in the market for a pretty low stress project that you don’t have to think about, grab some scraps and get started on your own scrappy trip!  Enjoy the process and you’ll love the end product.  

I’m excited to show this at our November guild meeting when everyone will showcase their own scrappy trips and share their results.  

Until next time!
Joanna


Posted on

Make your own Home Decor for cheap, with DIY tutorial included

Finally, I did a shortened version of my original tutorial  (since Blogspot doesn’t support PDF uploading–or I couldn’t figure it out!).

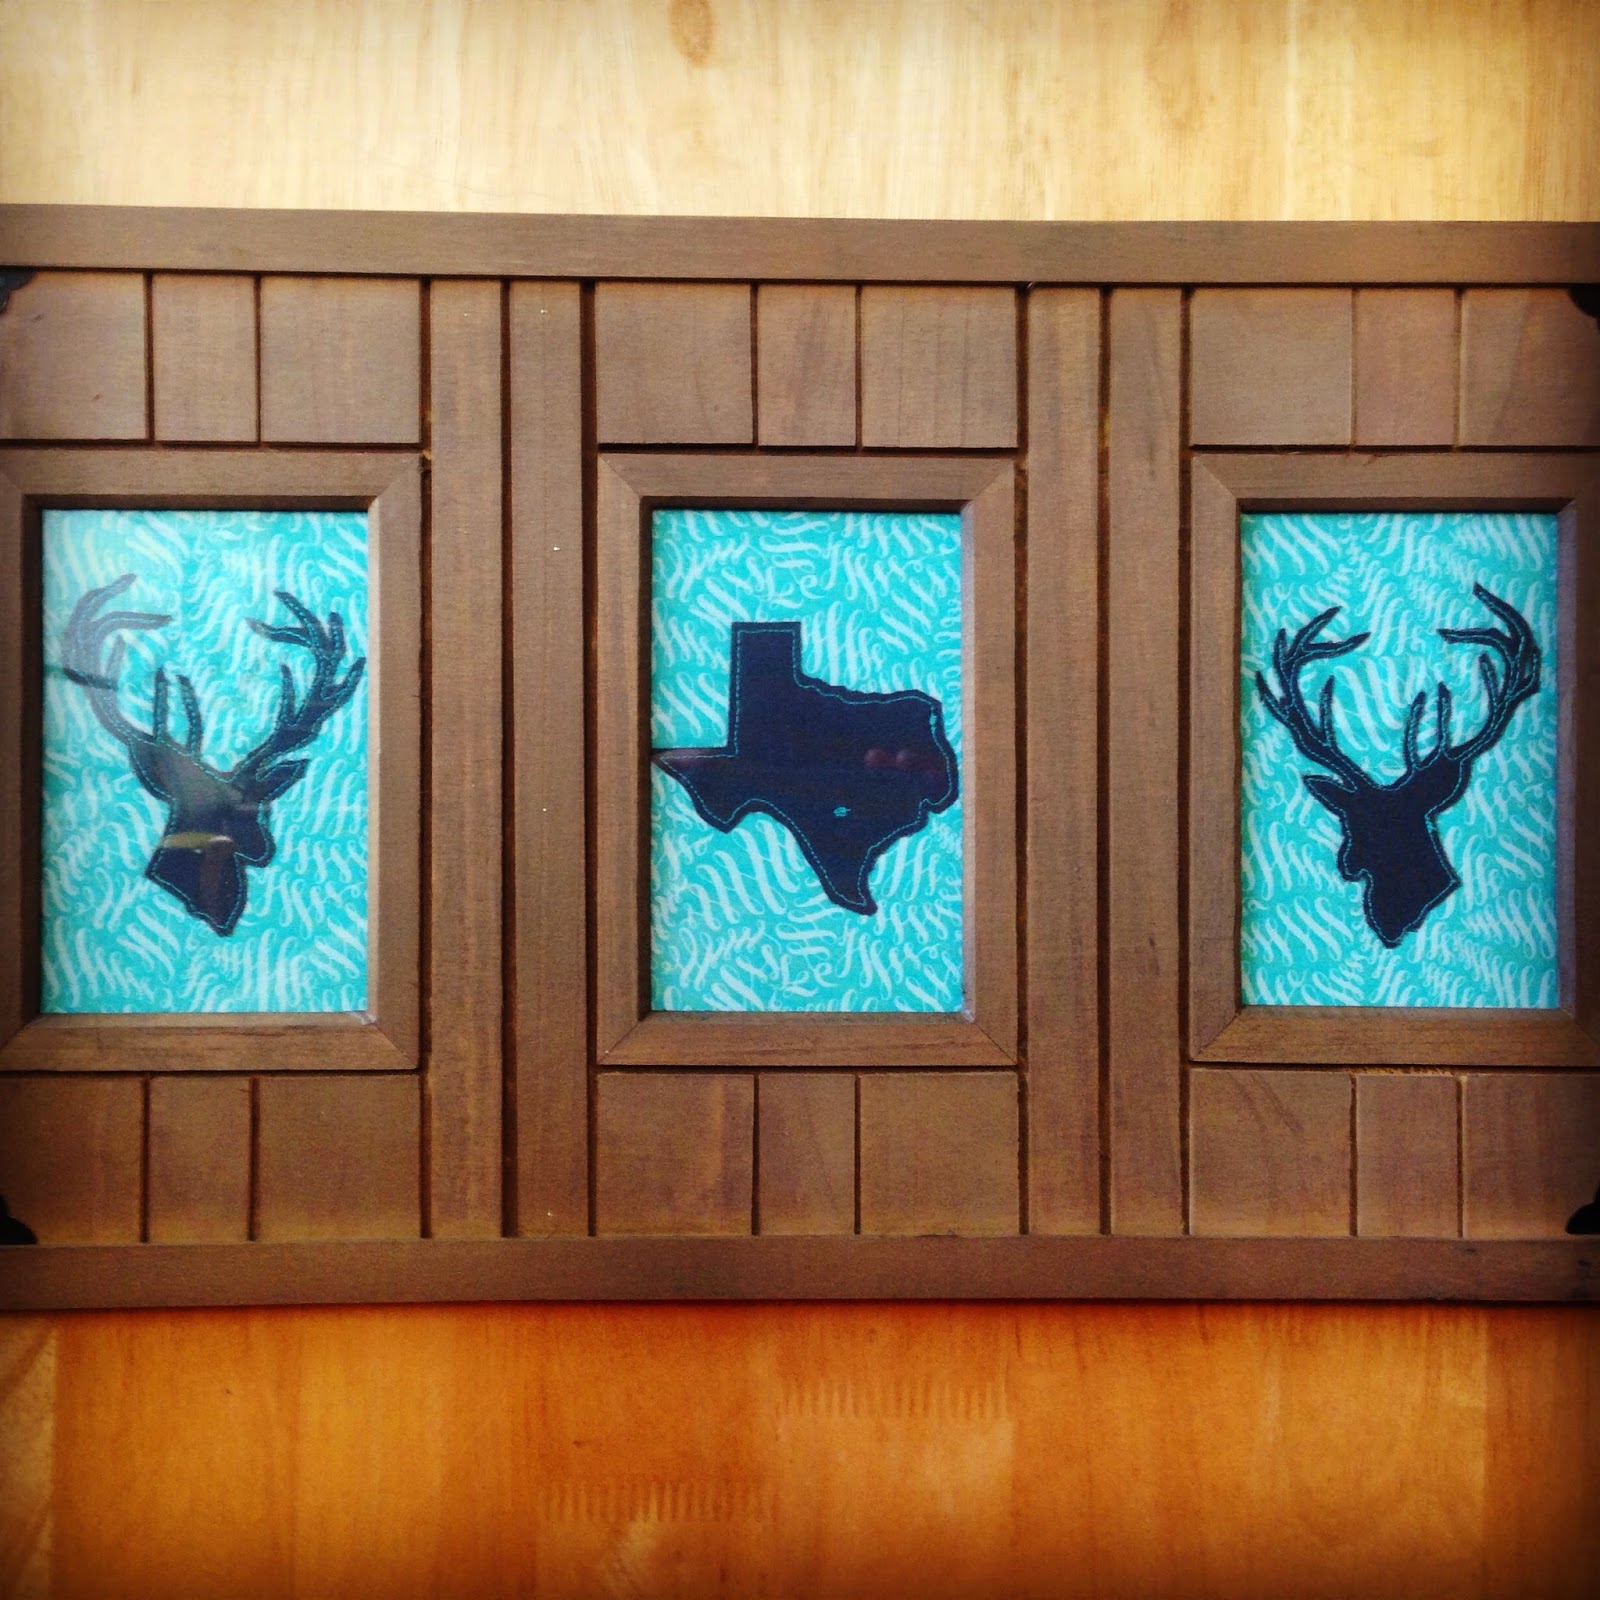
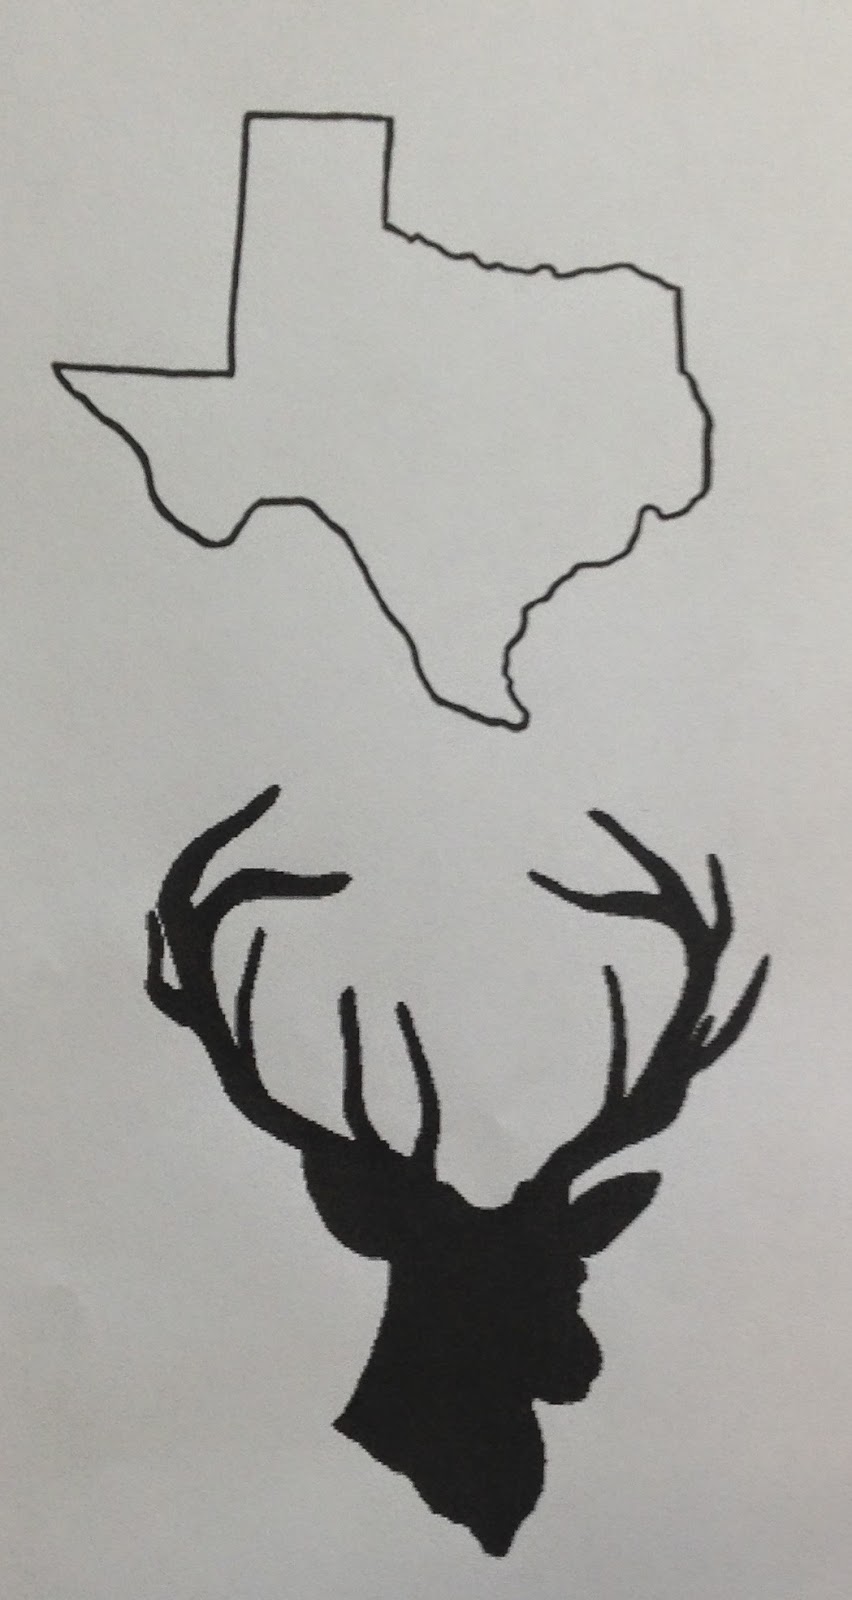
Above is the wall art that I made when I re-did our guest bathroom.  This is a very inexpensive way to make something to suit your taste and easily coordinate with your home decorations.  Just a heads up-this does take a good amount of time, and requires a little concentration-depending on how detailed your silhouette is.

First, you need to find a shape or silhouette that you like.  Keep in mind that you will be cutting this out AND sewing around the perimeter.  I suggest doing a practice one first with a circle or square–something simple and straightforward.  You might get really put out if you start with the deer!  

Print them out to the size you want them to be in your decor.


Now for your supply list-
Some kind of fusible stabilizer or interfacing that is thin to put behind your background fabric
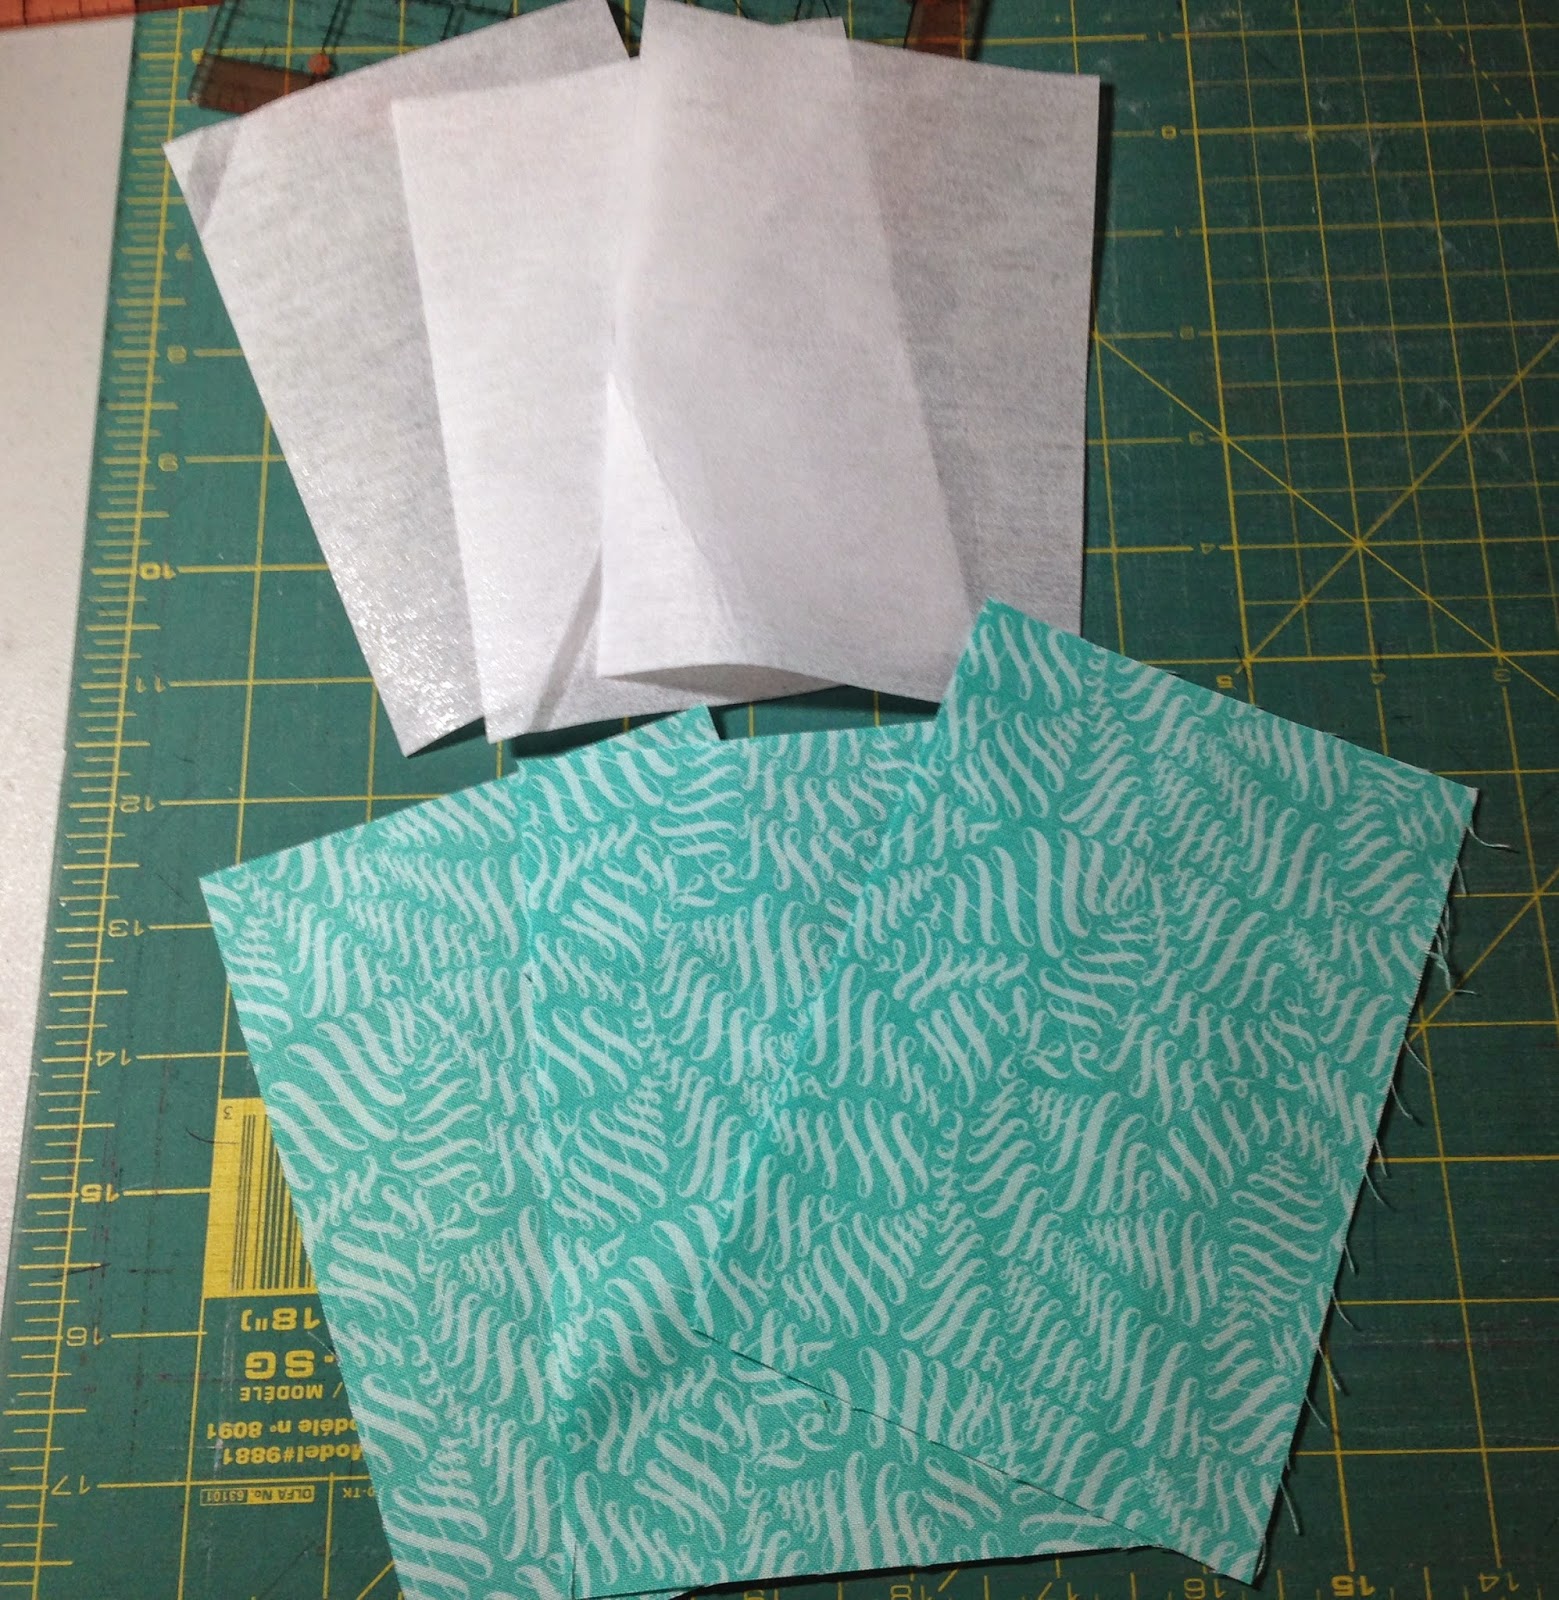
Background Fabric (pictured in the next photo)
Fabric for your silhouette
Rotary ruler
Iron
Precise scissors
Sewing machine/needle and thred
HeatnBond Lite
Sewing pins or scotch tape
Photo frame with enough spaces to put what you want in it

So this photo shows the thin interfacing that you will be fusing to your background fabric.  If you don’t have any handy, this step is not mandatory, so don’t fret!  

You’re going to cut your background fabric to the size the picture frame you bought is.  Make sure you cut the pieces a little larger than the viewing window so you can easily secure them.

Cut your pieces of stabilizer to the same size as your background fabric pieces.  I have three in this picture because I had a 3-photo frame.  

Follow the manufacturer’s instructions for fusing the stabilizer to the fabric.  Now you can set these beauties aside, because you won’t need them for a while!

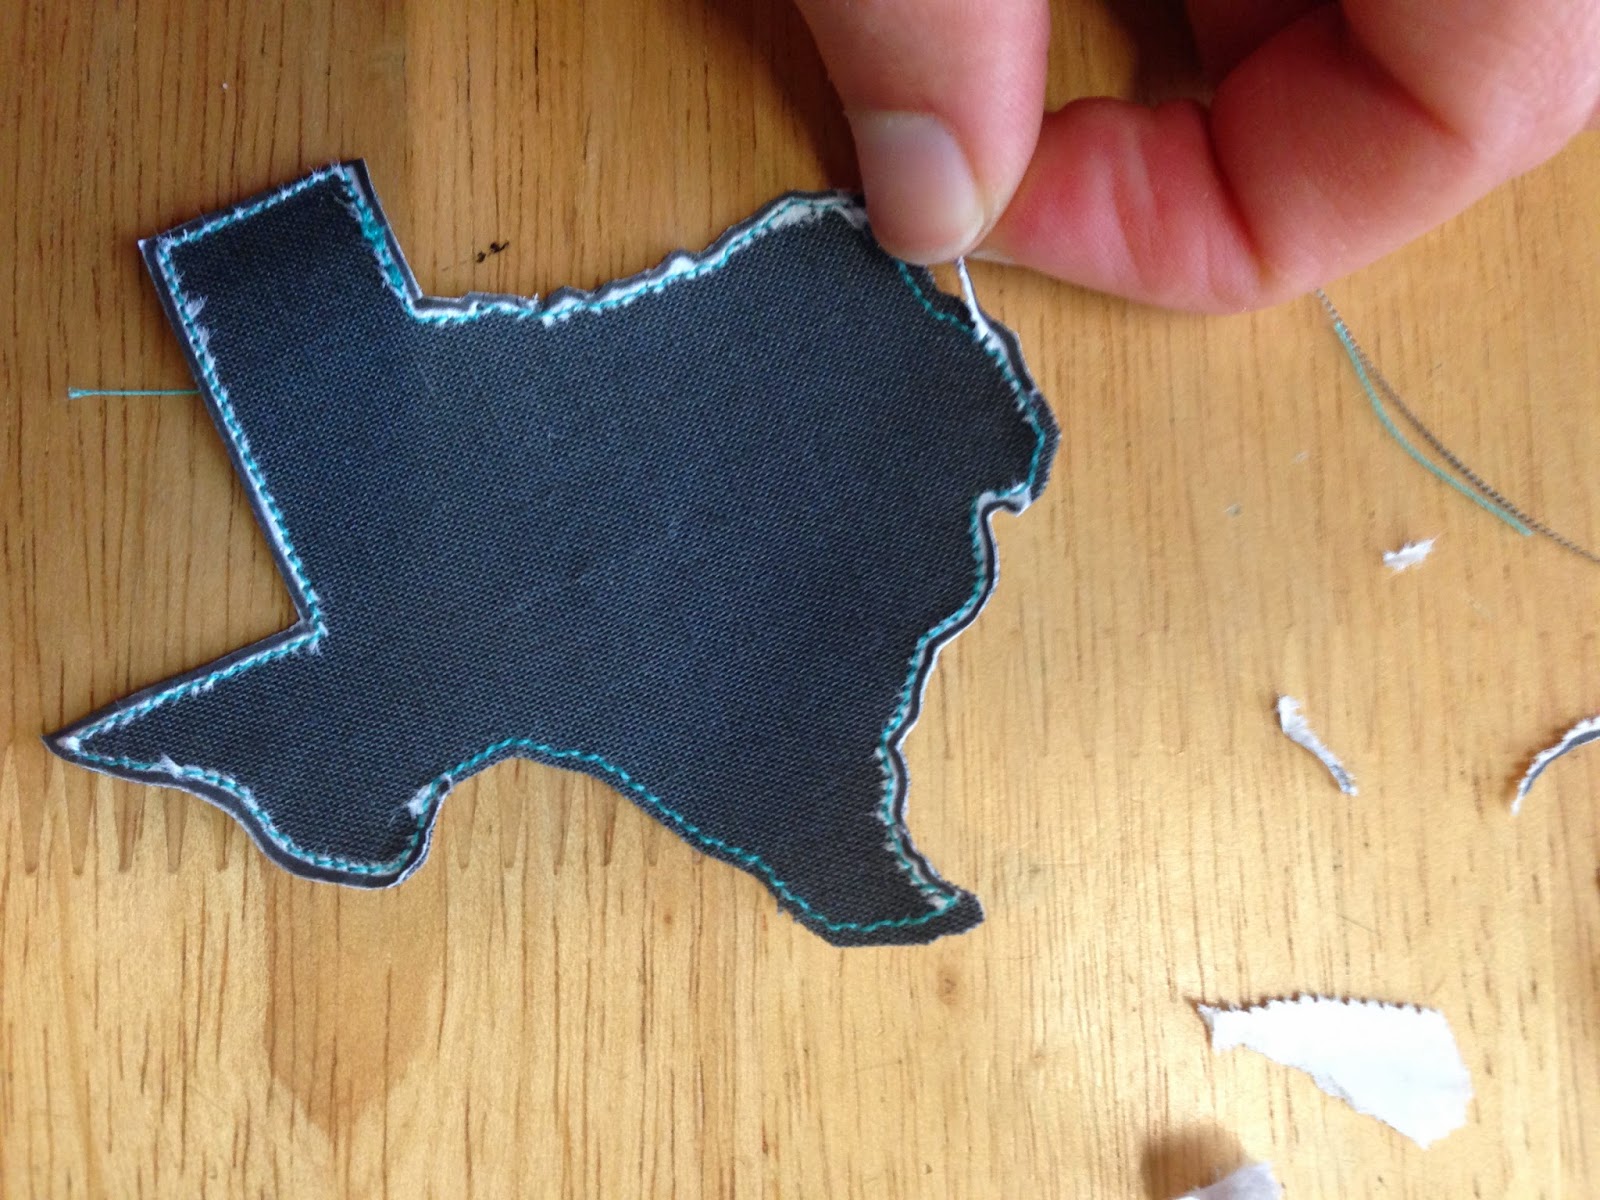
Now cut your silhouette down to the smallest you can get it without cutting on the lines.  You’re going to prep your silhouette fabric now…

Before you cut your fabric, lay your shape on top of it and make sure you have a good inch extra on all 4 sides.  It’s better to have a little extra to play with if you need it than having to go back and cut more if you make a mistake.  Once you measure, go ahead and cut the fabric to size.


Cut a piece of HeatnBond to just a LITTLE larger than your silhouette.  Place it shiny side down on the wrong side of your silhouette fabric.  Follow the manufacturer’s instructions for bonding.  Mine said not to use steam, so make sure you don’t!  


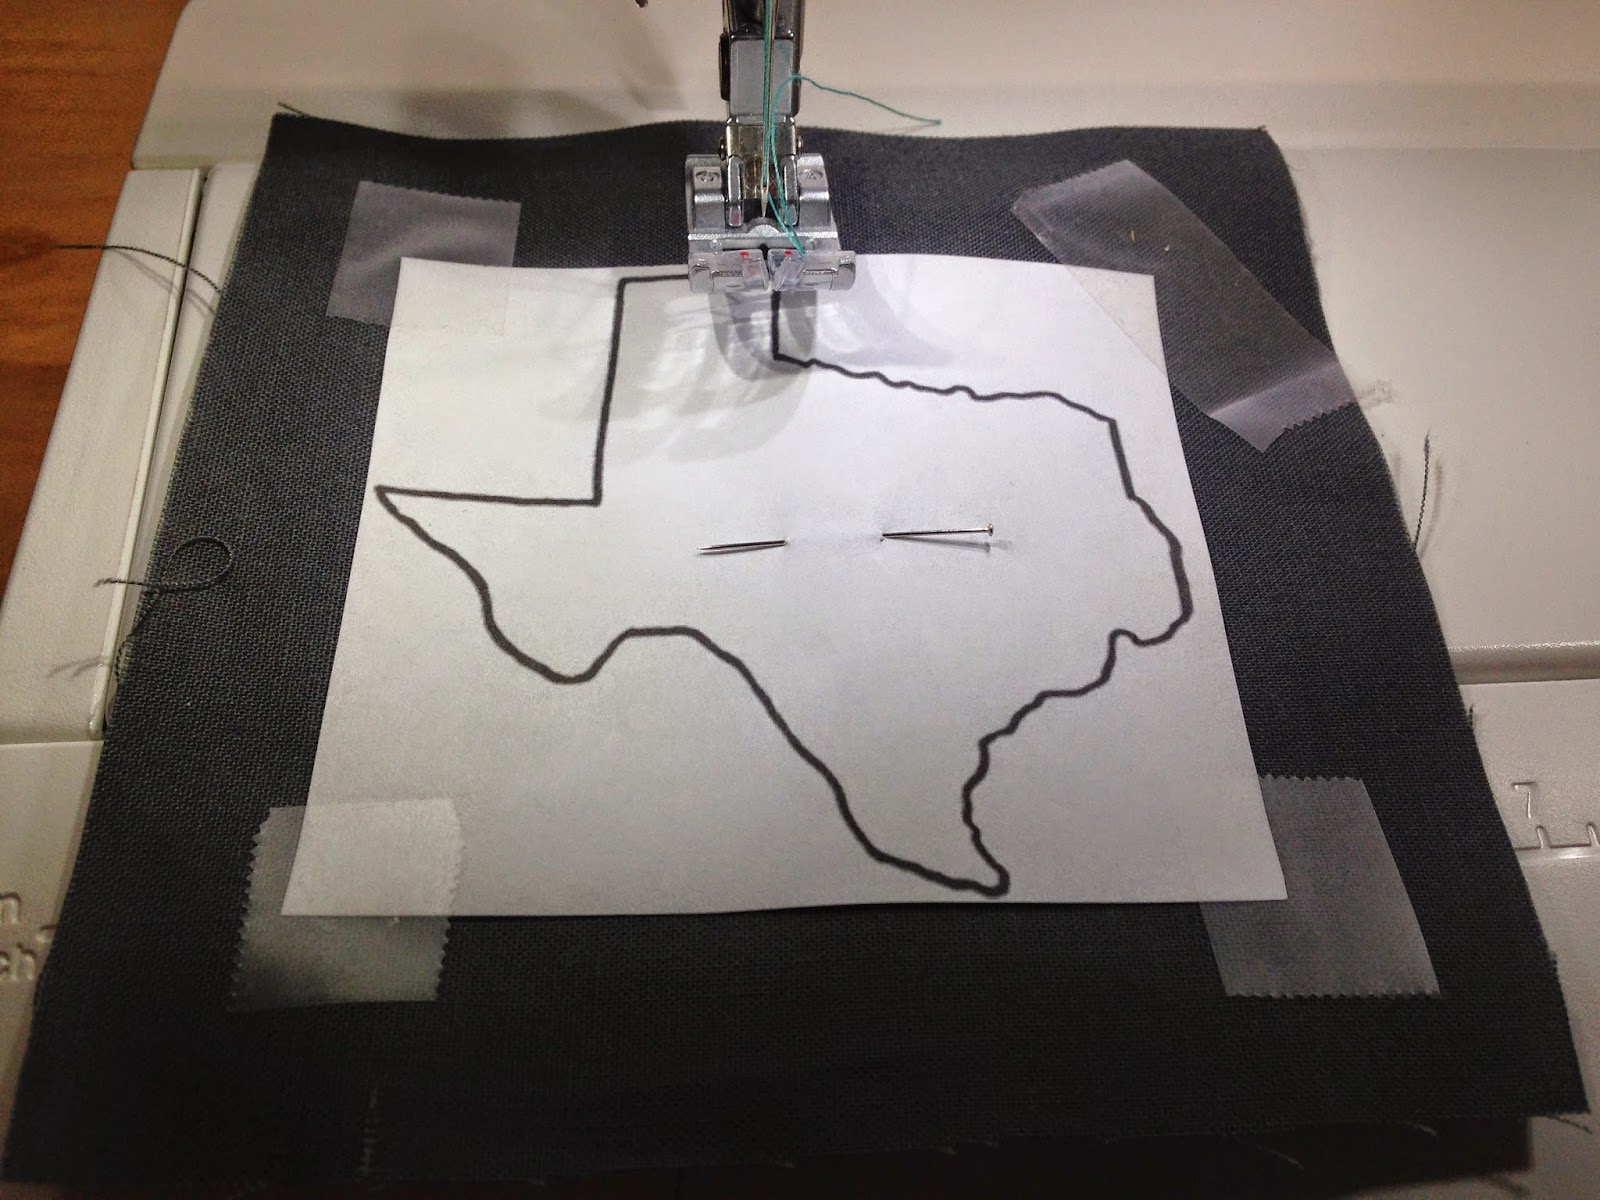
Once you’ve got your HeatnBond on the back of your silhouette fabric, flip your fabric over so it is right-side up.  You may want to choose a fabric that isn’t solid colored-sometimes it’s hard to determine which is the front or back.  I use scotch tape and pins to secure my silhouette shape to the fabric–make sure your shape is directly over the HeatNBond.  If you can’t tell, hold your fabric with the silhouette up to a light source and you should be able to see the HeatnBond with no problems.

Now you’re ready to get stitching!  You’re going to sew ON THE LINES of your silhouette.  
You don’t need a machine to do this, but it sure goes a Heck of a lot faster if you do.


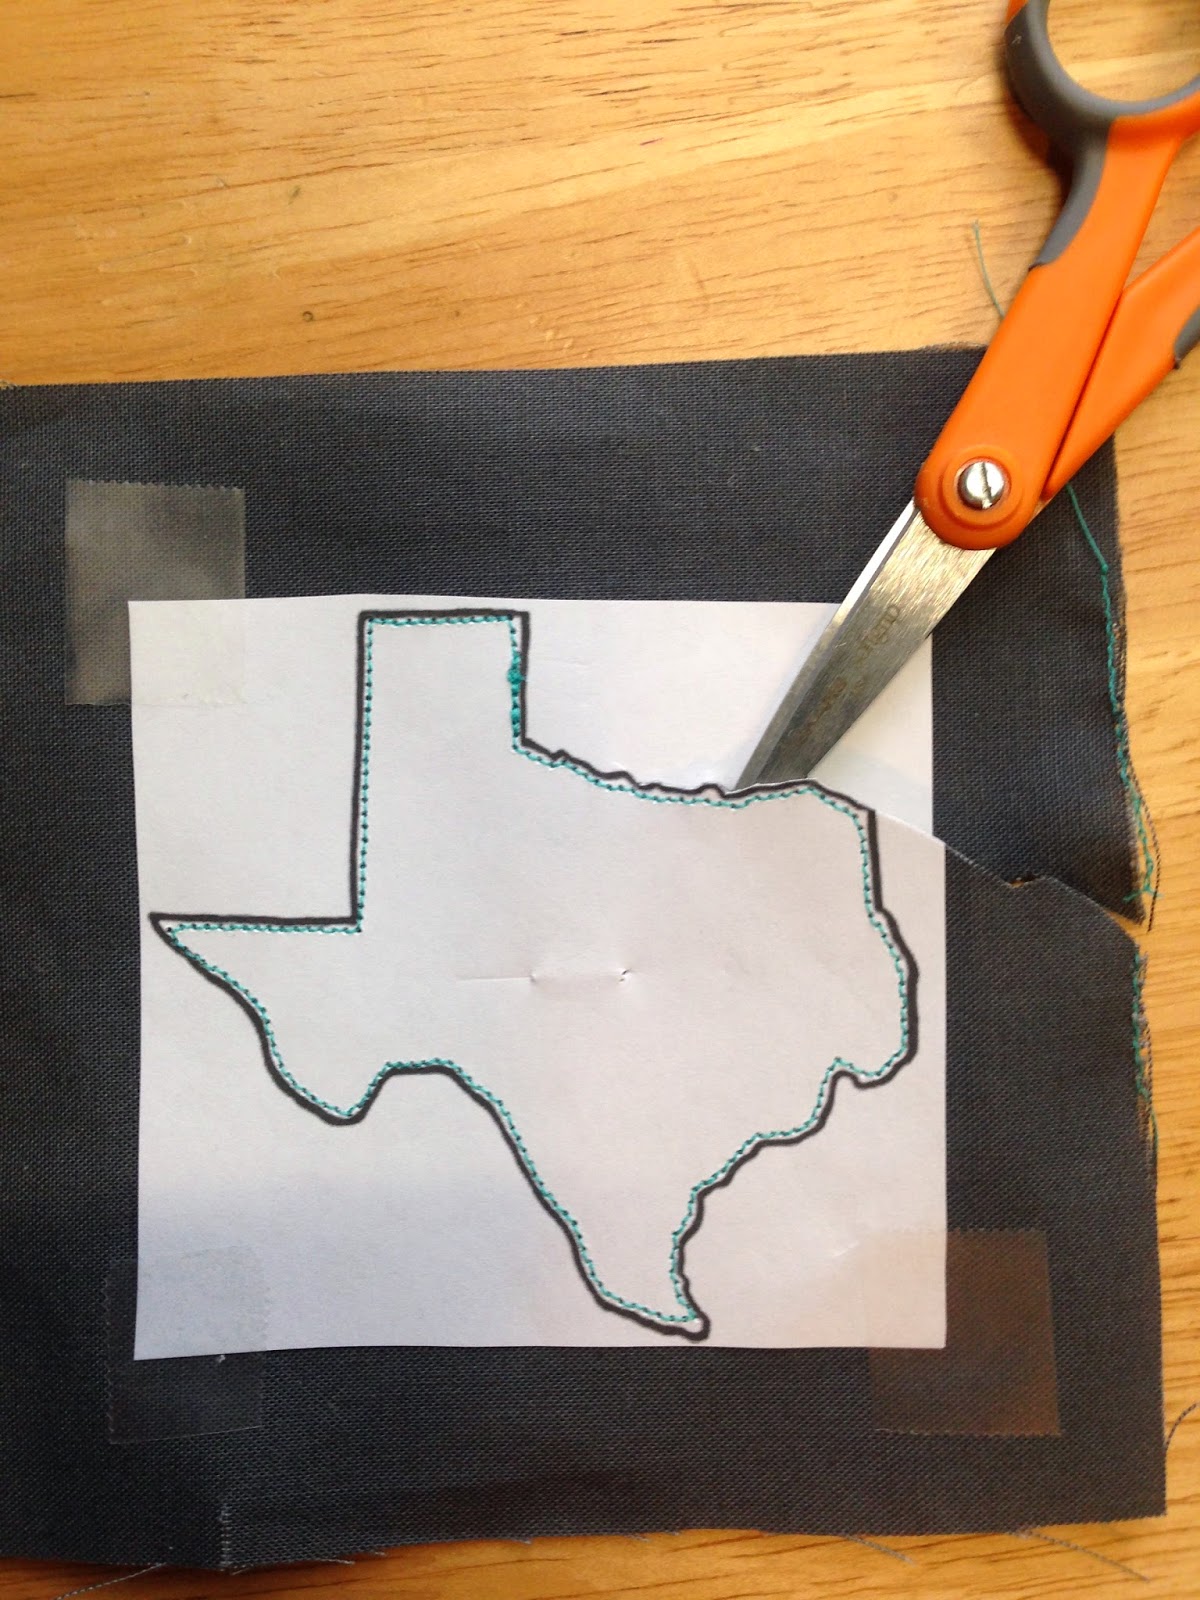
After you have your outline sewn, you’re going to cut through all layers around the silhouette.  It’s a good idea to leave a 1/8″ space between the stitching line and your cuts.  If you cut too close, you risk cutting the thread, or having the fabric fray–which you definitely do not want!

Now you’re going to peel off the printer paper from the front of you shape, and the paper backing from the HeatNBond from the back of the shape.  You even have to peel off the measly little paper between the cuts you just made and your line of stitching.  Be careful to not fray the fabric.  This is why I told you to leave a 1/8″ space.  You can see that I did not.  I’ve done this a few times before and so I knew I could get away with that.  You might find that too.  But for now, leave 1/8″. 


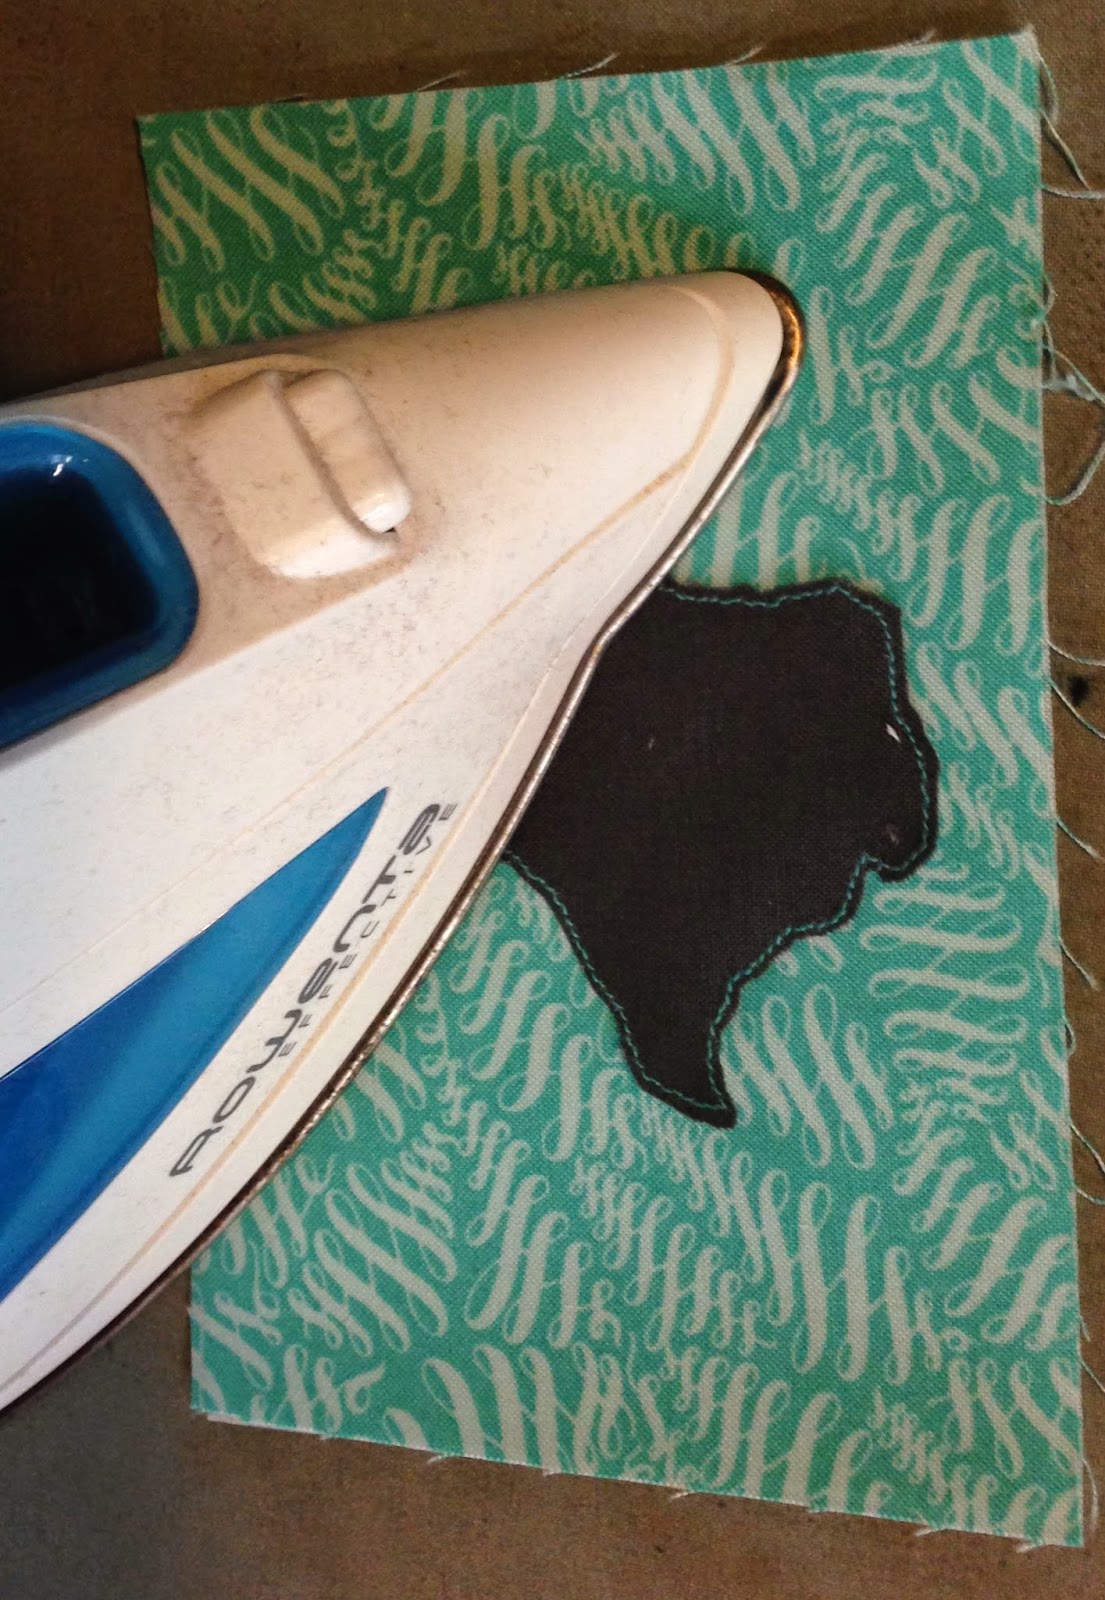
After you remove the paper backing, you can go grab your background fabric and center your silhouette on it.  I think the easiest way to do this is with a rotary ruler or some kind of clear acrylic ruler.  Makes things move a little faster–but you can also use just a regular ruler.


Now, look at the manufacturer’s instructions on how to apply the HeatNBond, and follow the directions.  You will now fuse the silhouette to the background fabric.


Once you’ve done that, you’re ready to frame it!  Just remember to minimize the handling of the silhouette so the edges don’t fray.  If you have more than one, you’ll just repeat these steps with each other piece you have.

Please let me know if you have any questions, and good luck on your new wall decor!

Joanna

Posted on

My first Quilting class to TEACH!

Many of us sewing enthusiasts dream of one day being able to actually do this for a living…am I right?  I didn’t realize that sewing and creating brought me so much joy until a few years ago.  Now I wonder how I ever did without it.  I wonder what I did with my free time with no project waiting for me in the other room.  

This past week, I visited with a local store owner in the San Antonio area.  It’s a new quilt shop in Boerne, TX, called Sew It Fabulous.  The owner is ridiculously awesome!  She is allowing me the opportunity to teach a beginning quilting class on August 2.  

And this is a portion of her shop’s newsletter.  I’m so excited to do this, even if it turns out to be a one time thing.  I hope that I can help other people to become excited about sewing–because I know how frustrated those first stitches can make a person.  I remember when I first started using my little rinky dink Singer and how all of my seams would be off and unfinished, and I was still so proud of myself for what I had made.  

Last week, I also prepared a step-by-step tutorial of how to do the wall-hanging applique project that I had posted about (spent hours on it!), only to find that when I went to upload it that this host does not allow you to upload PDF.  GRRRRR.  I will find another way to post the tutorial, because it really is a great project-even for beginners.  So I guess this post is mostly just an update that I WILL post the tut…eventually!  More to come soon!

Joanna