Posted on

Hexie EPP Stocking Pattern

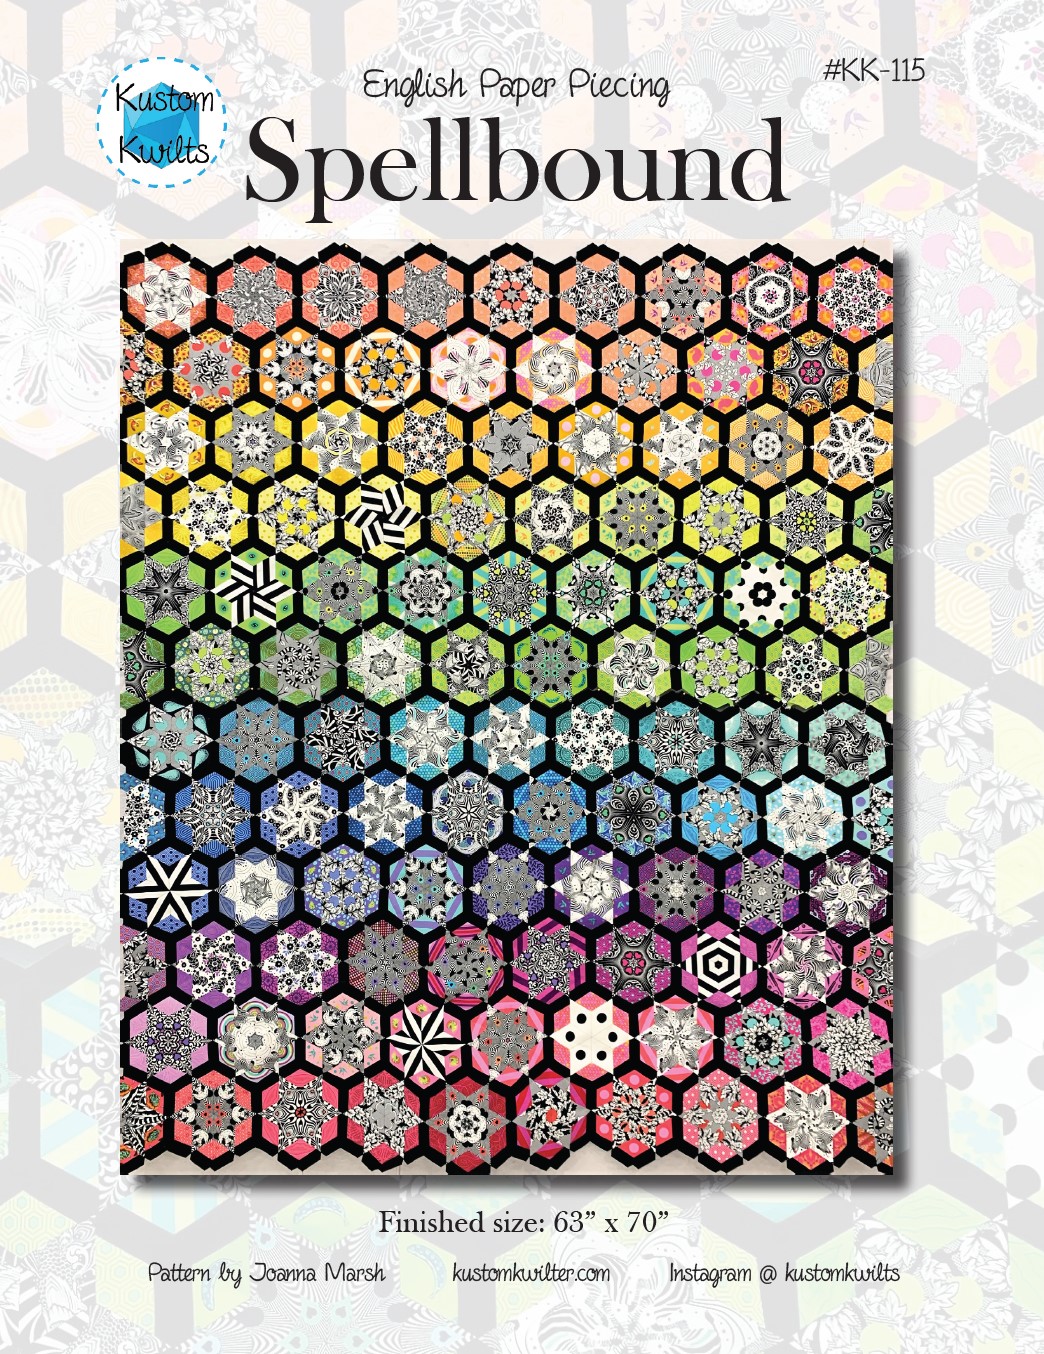
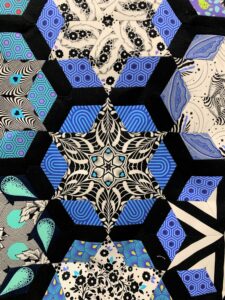
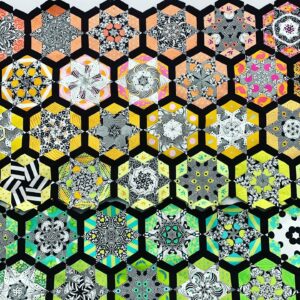
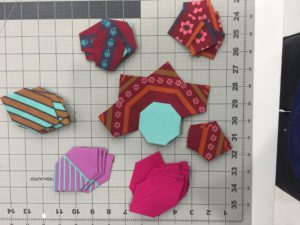
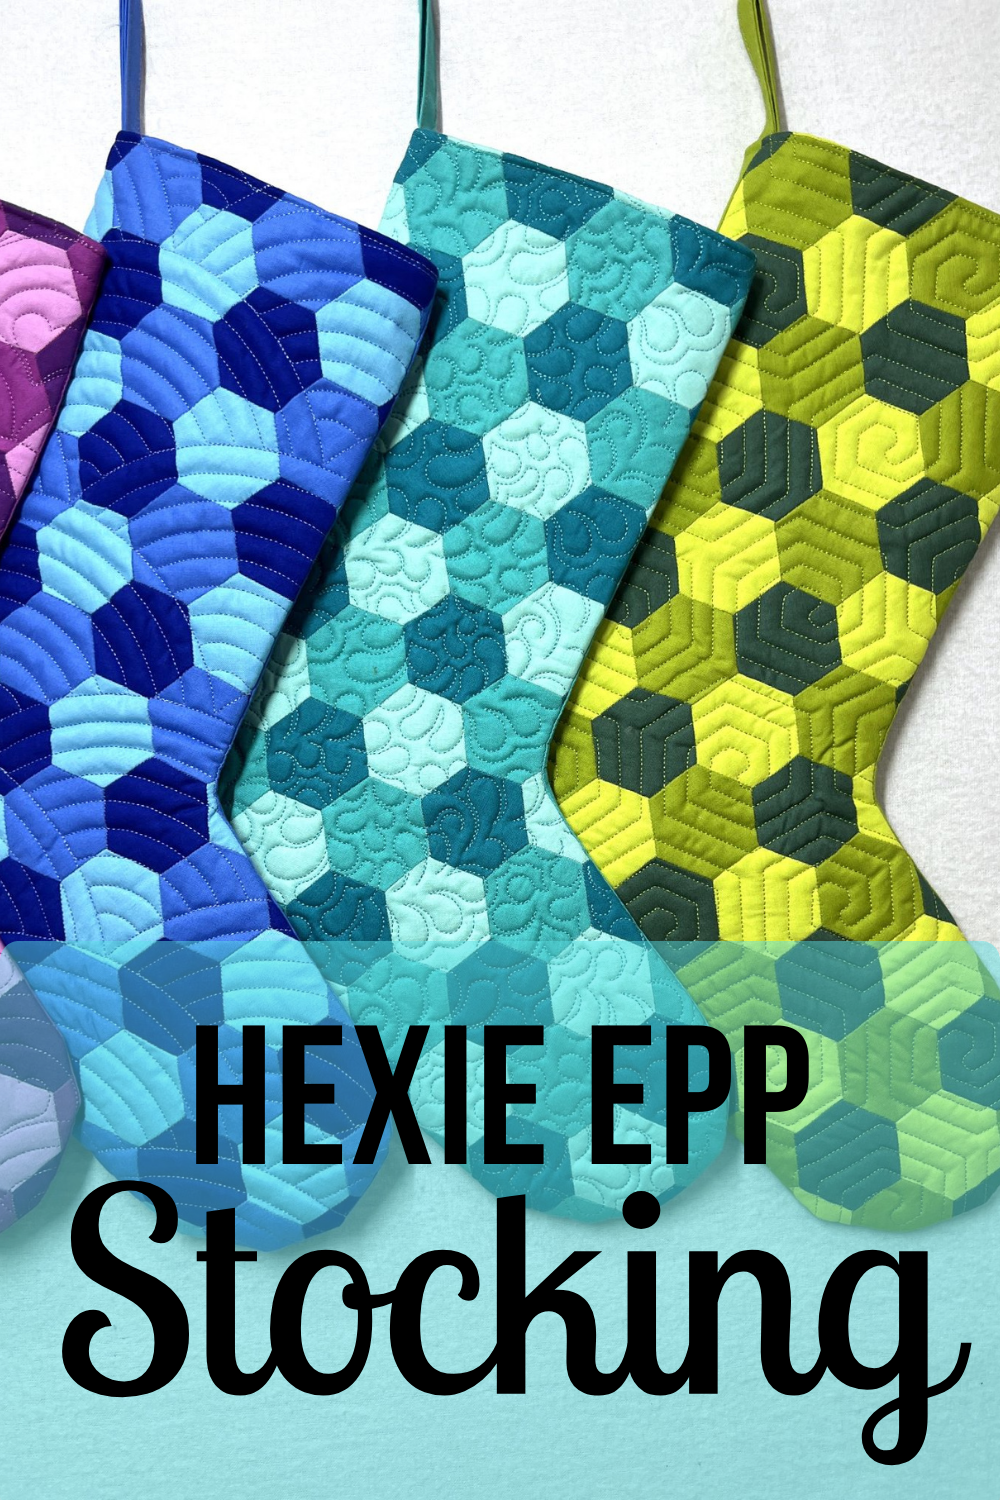
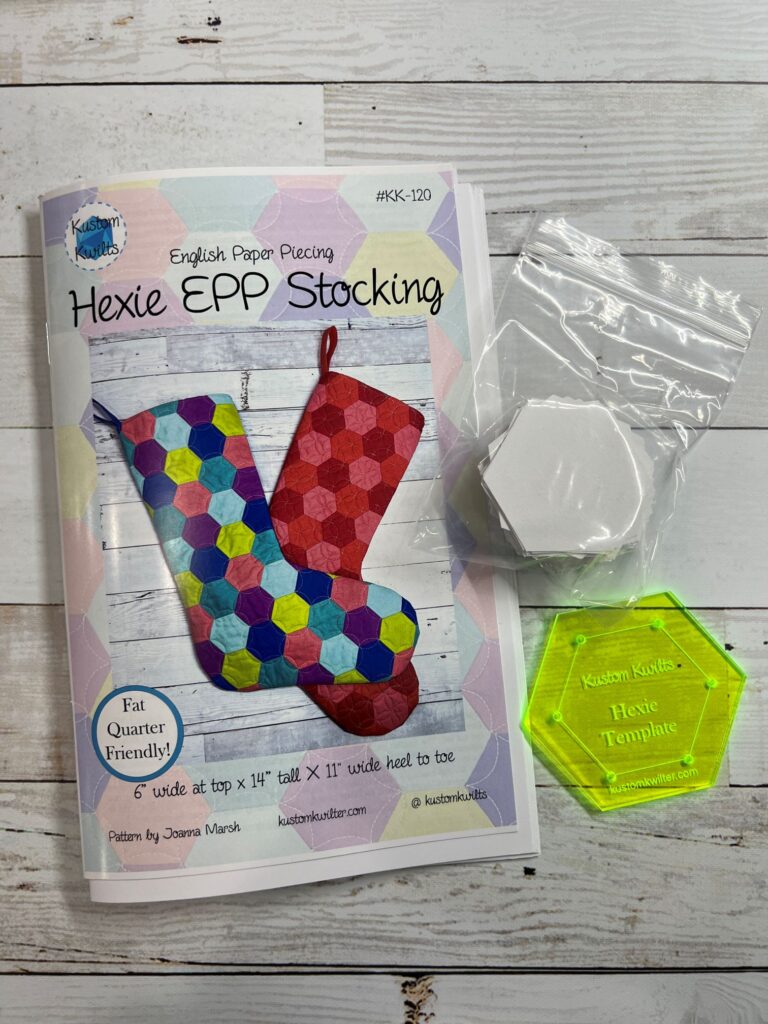
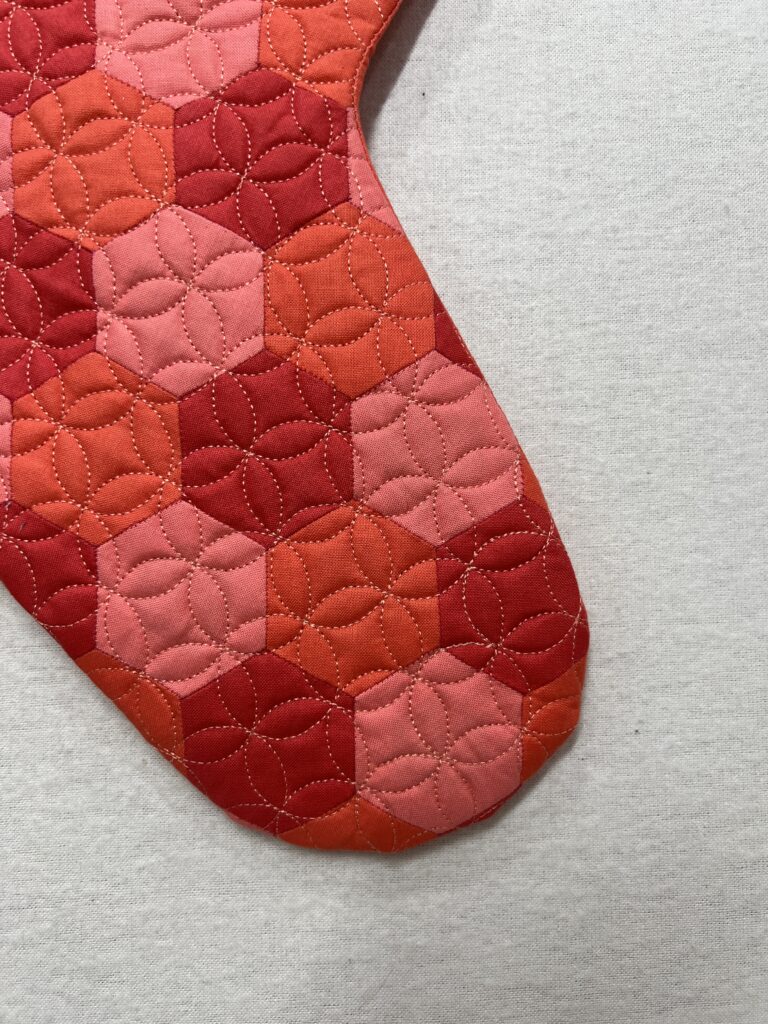
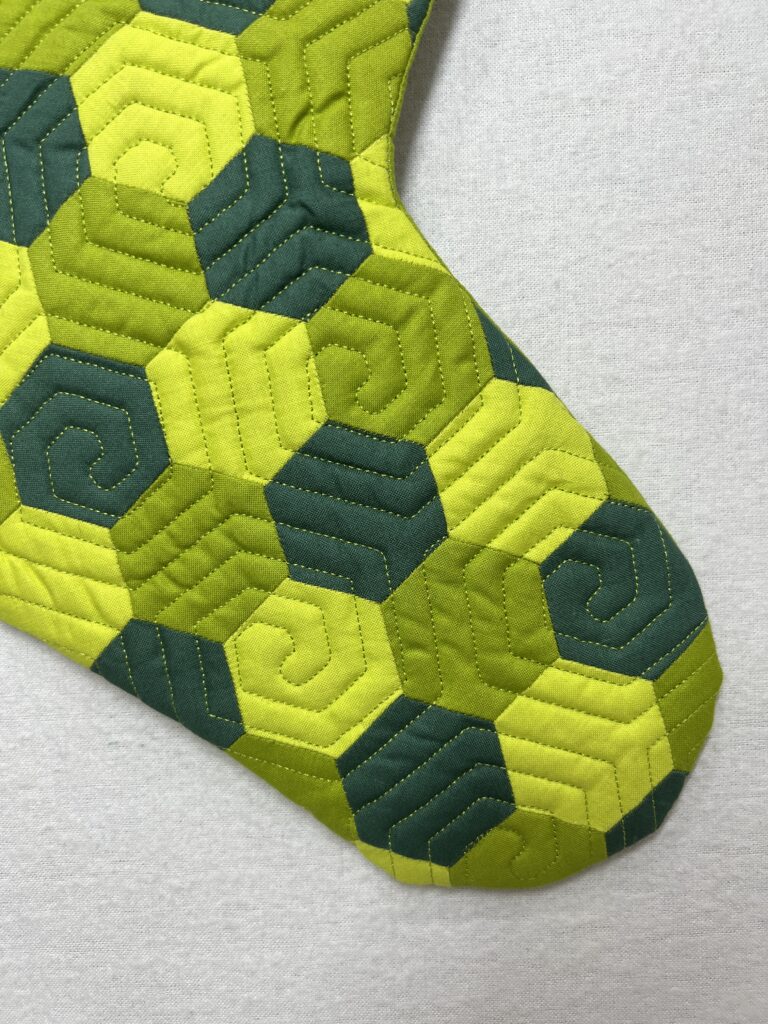
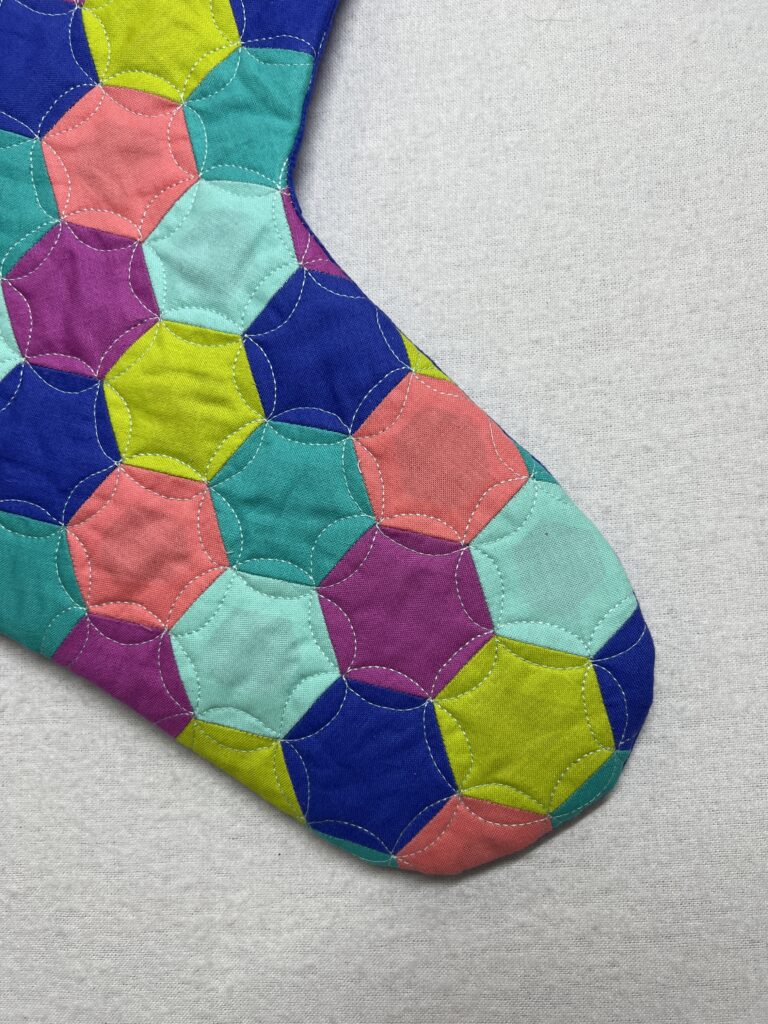
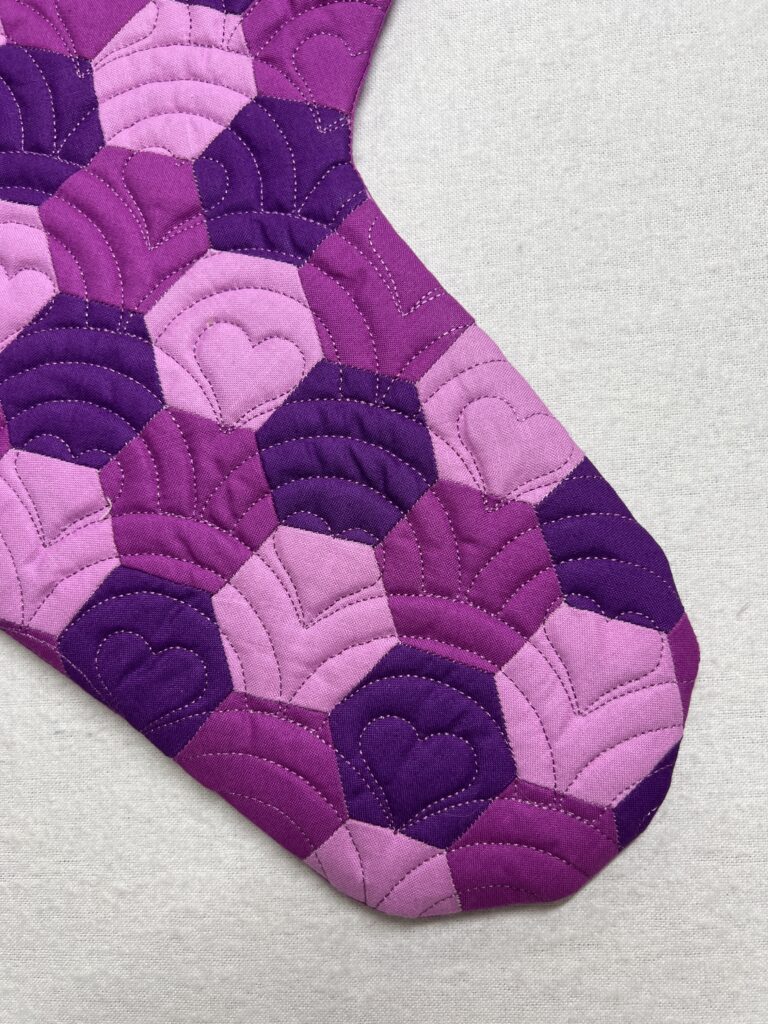
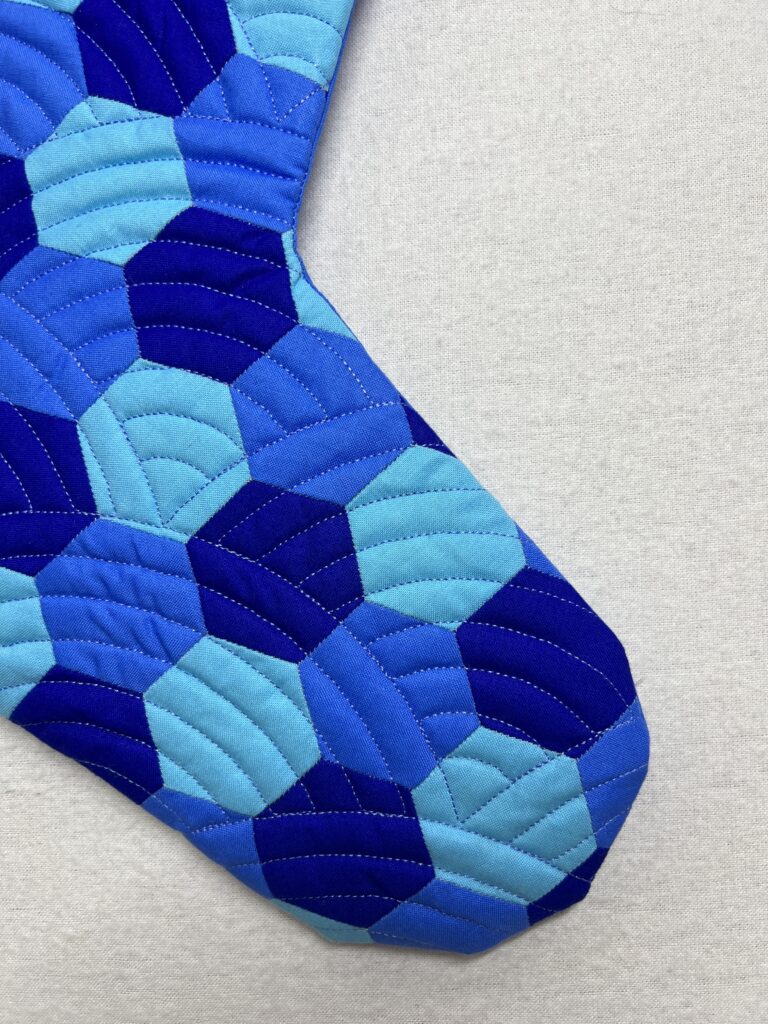
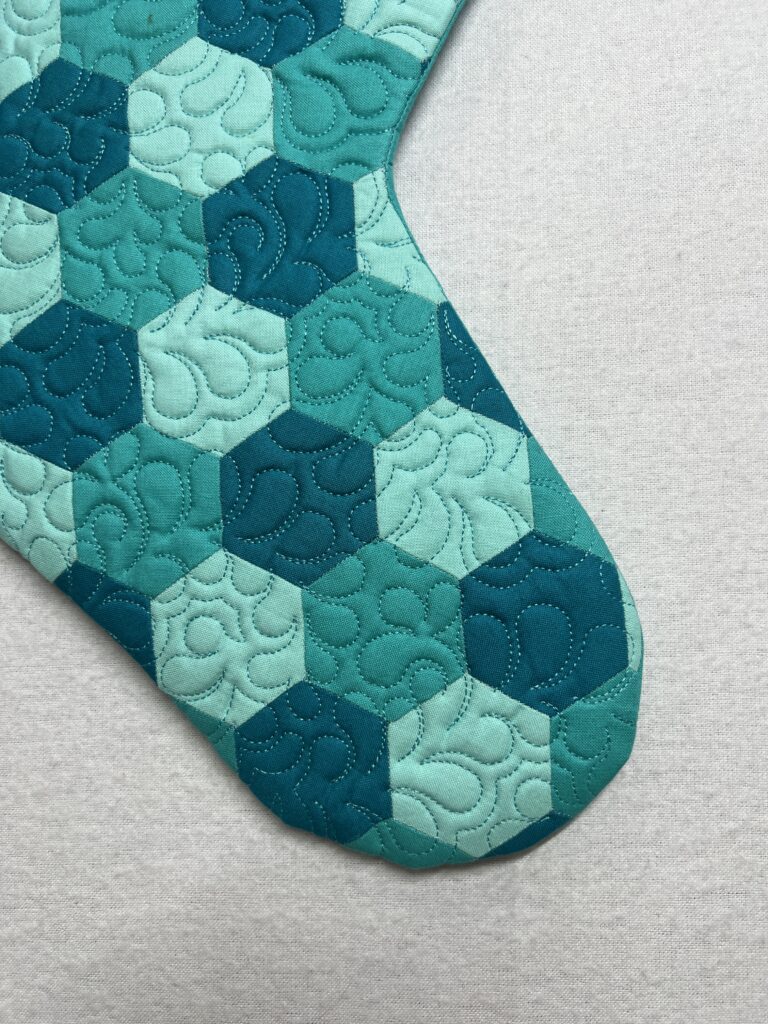
The Hexie EPP Stocking Pattern is finally here! This is a perfect pattern for a quick finish, and it saves time and fabric by not having to fussy cut. I designed these stockings to have a similar look to the cute Buffalo Plaid that has a more clean and modern Christmas-y look, but with hexagons. The pattern details how to make the stocking using the 3-color solids, or for a more fun look, a 6-color solid multicolor stocking. Using solids eliminates the need to spend tons of extra time fussy cutting, and you can use the stack and cut method to cut multiple hexies out at once. I think the most I was able to cut at one time was 8 pieces.

This pattern includes:

  • Detailed instructions for solids: 3-colors or 6-colors or fussy cut your own pieces
  • Pattern includes Youtube tutorial sew along to assemble the stocking
  • finished stocking measures 6” wide at top x 14” tall X 11″ wide heel to toe, complete with hanging loop
  • Blank coloring sheet to design your own colorway or plan for fussy cutting
  • Fabric requirements for the 3 and 6 color stockings
  • Detailed cutting diagrams
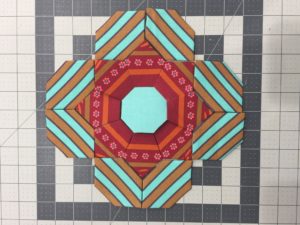
  • Full color diagrams and step outs
  • Stocking template
  • Printed pattern version includes a full sheet of hexie papers for you to copy and cut out yourself, should you choose
  • PDF version includes a printable sheet of hexie papers

So many options!

Kits for the Hexie EPP Stockings:

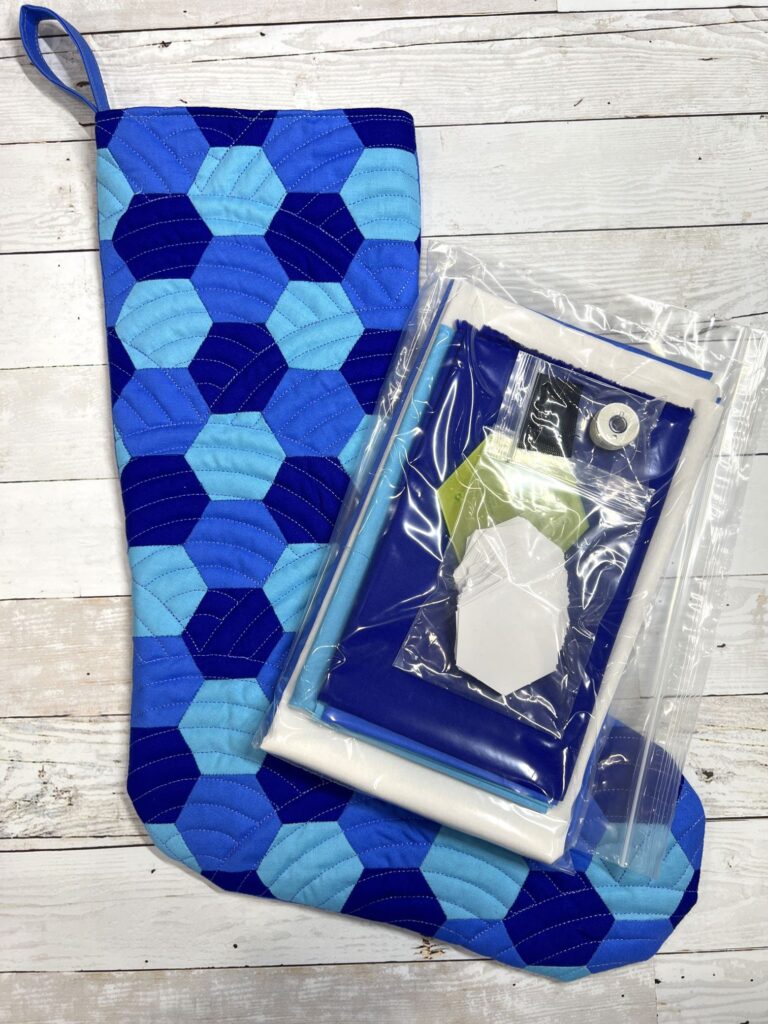
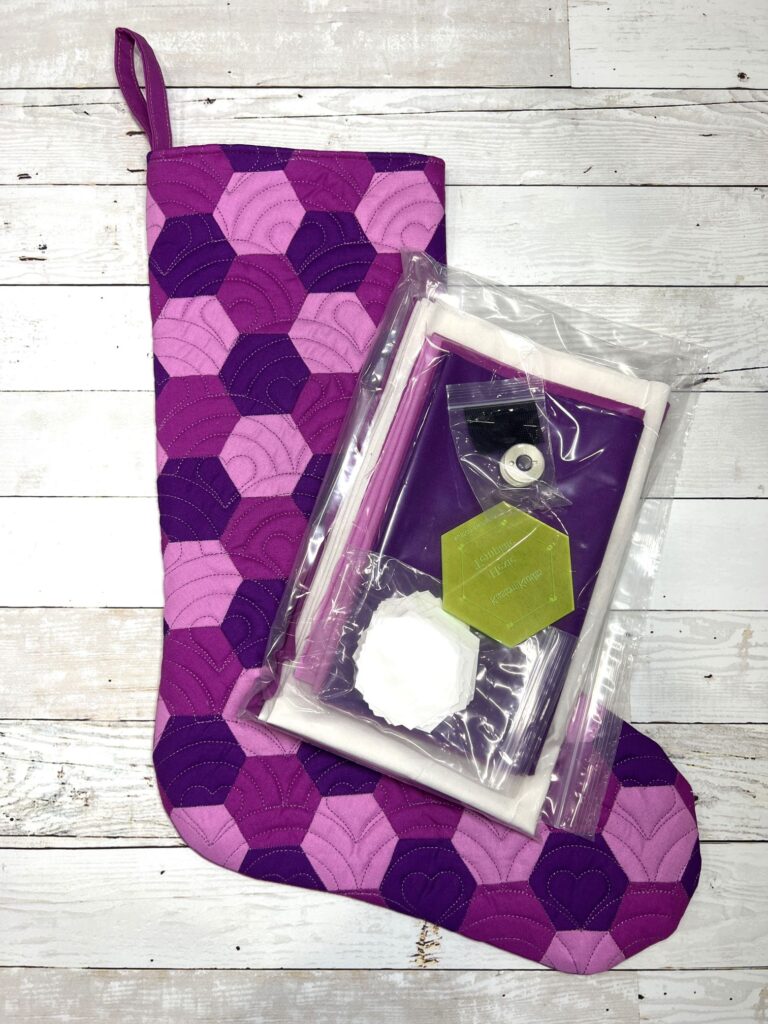
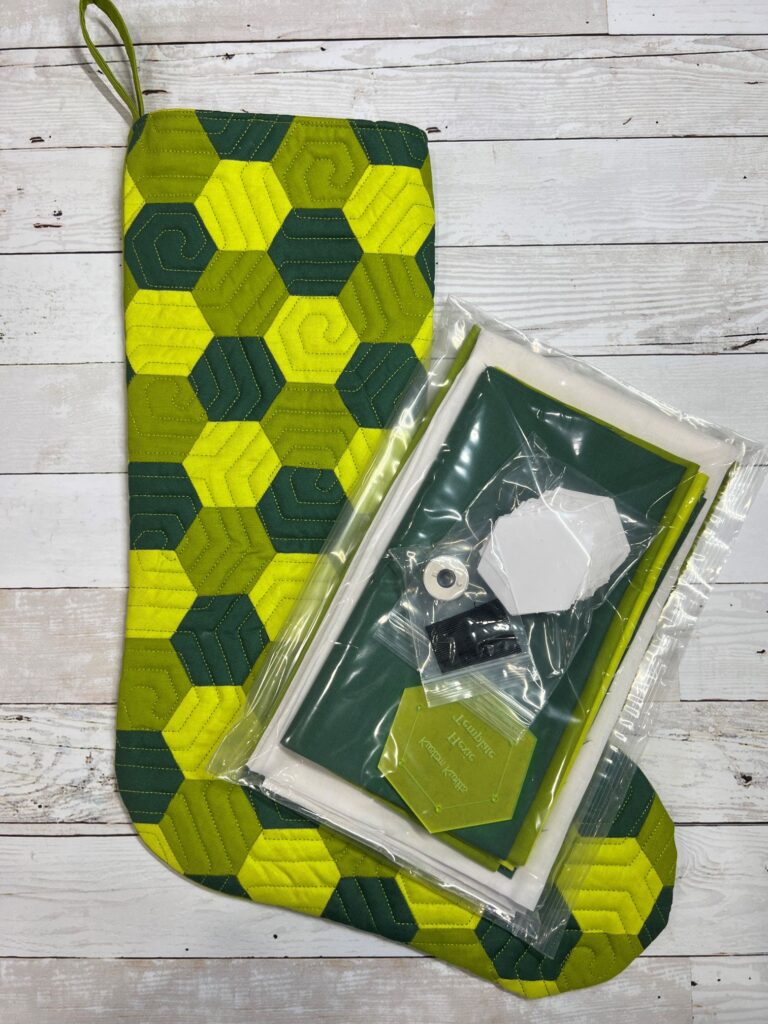
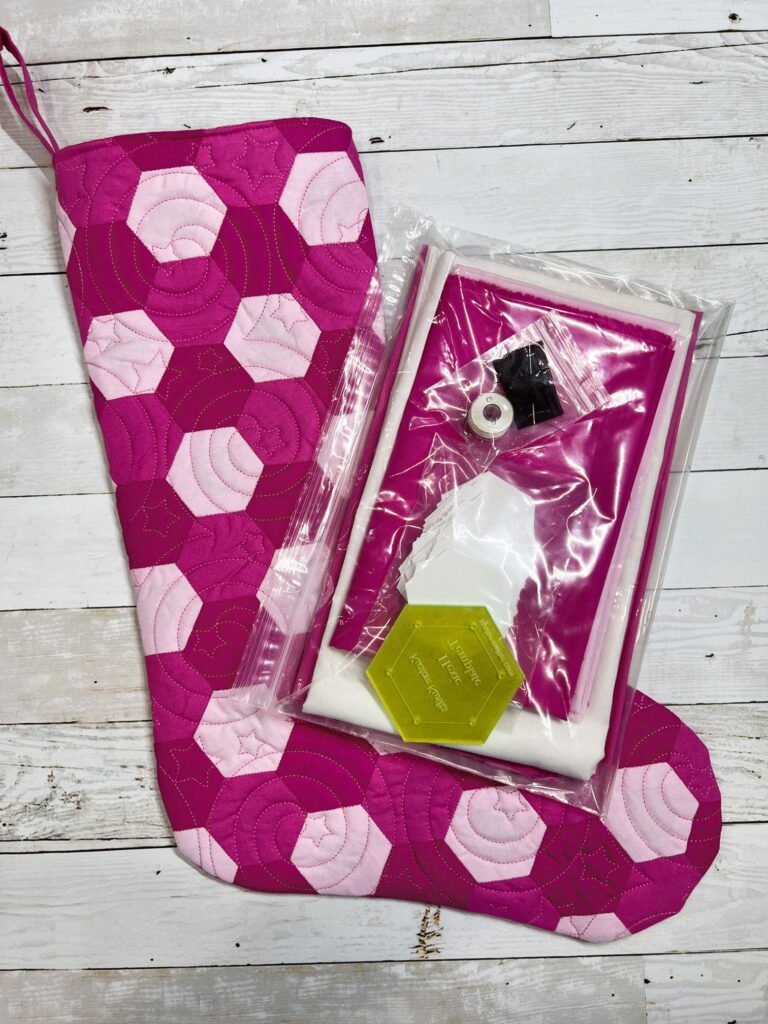
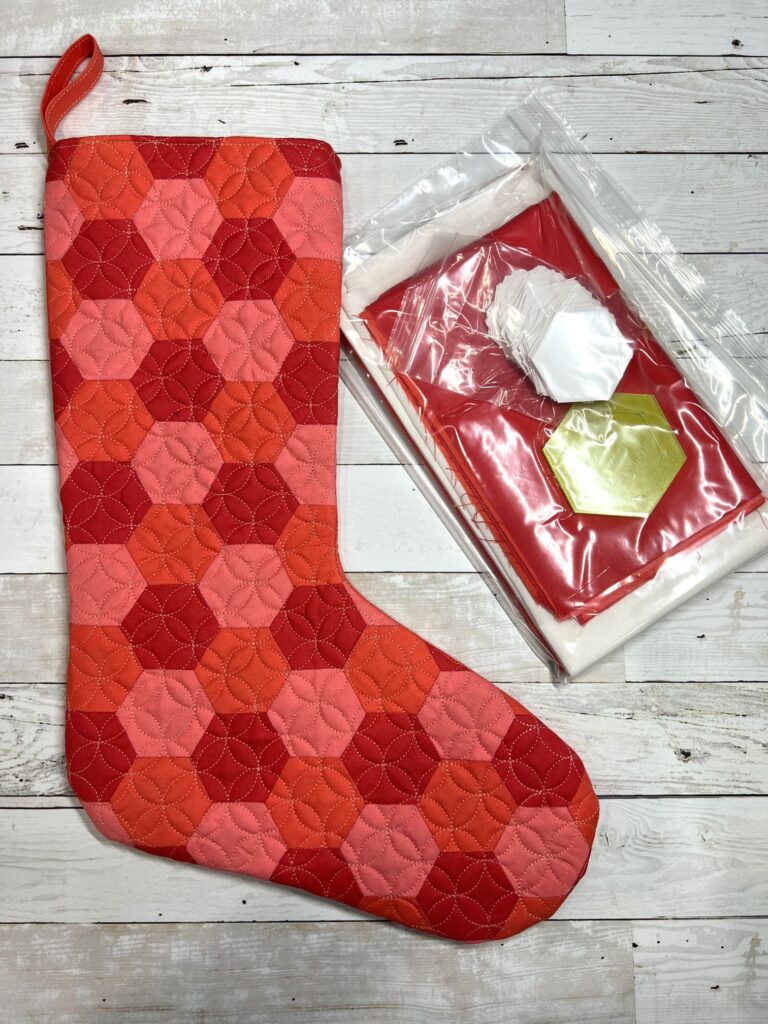
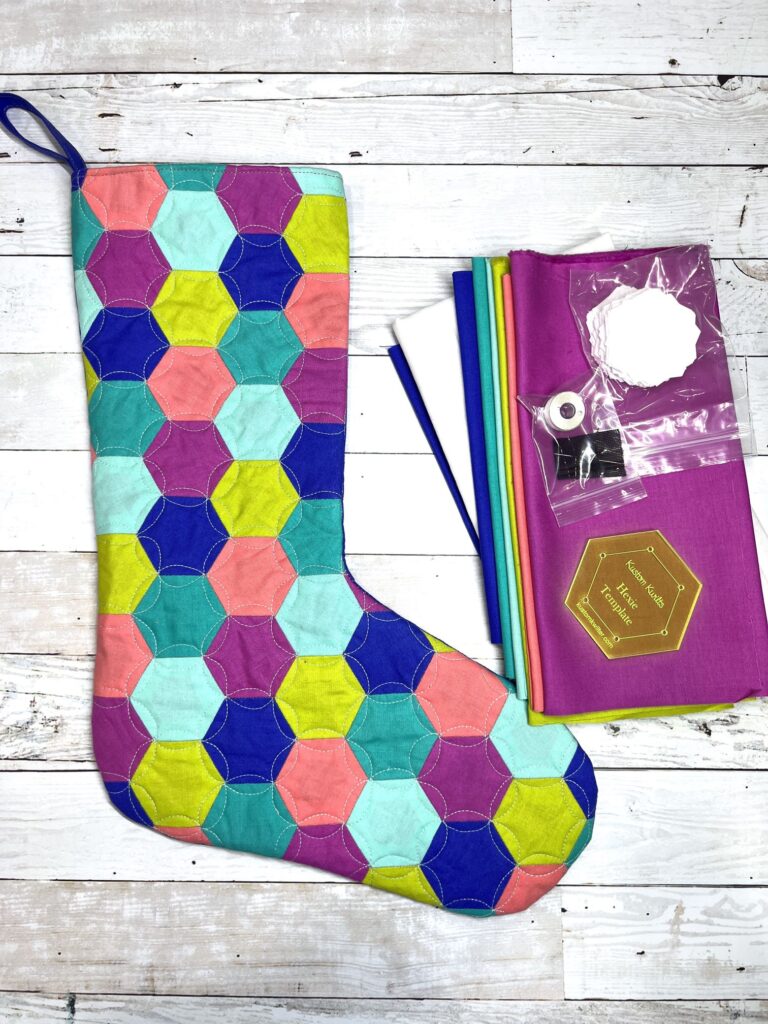
Find the perfect kit for you! These solid stockings are curated in the perfect shades of Tula Pink solids by FreeSpirit. Grab the color that fits you, or make an entire fabulous rainbow gradient to fill your mantle!

If you aren’t a fan of fabric kits, you can also grab your own acrylic fussy cutting template and precut EPP papers to save you a little time. Or cut your own hexies with the papers that are included in the PDF or the printed pattern. Both options have a printed OR printable paper Hexie fussy cutting template.

hexie EPP stocking pattern

Customizing your stocking

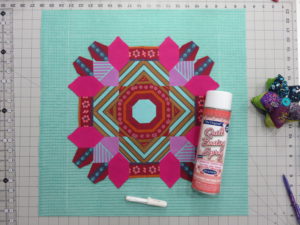
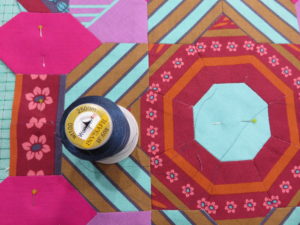
You can choose to quilt your stocking with fun hand quilting, easy domestic machine quilting with simple straight lines, or pick a fun pantograph and throw it on the longarm for a bit of punch! Alternatively, you don’t have to quilt the stocking at all and the inside is fully lined to protect all the seams. Pattern instructions include a hanging loop.

I’m so excited to finally share this pattern with you. I feel like I have been working on it for years and perfecting each version so it will bring you SO much joy when you make it. I hope you’ll share your makes with me using #HexieEPPStocking . Thanks for reading, friend, and happy sewing!!

Posted on

Spellbound EPP – a magical quilt pattern

PDF ONLY

My labor of love (aside from longarming) this year has been the Spellbound EPP pattern! When Tula Pink released her black and white line called Linework, I knew I wanted to make something really special with it. I love black and white fabrics and adding a pop of color to them really sets them apart. I’ve had a blast on this journey picking the fabrics and fussy cutting different elements of each fabric to make it shine. The Spellbound quilt pattern will be available this Friday, October 29!

I am a little bit of a mover and a shaker. You know what I mean–I’m one of those people that can’t stand to just sit idle and not do anything. If you’re here, and reading this, you might have this problem too 😉 . If I have some free time and a free set of hands, you better believe I’ve got some EPP prepped and ready to go. Aside from longarm quilting (which I do almost all day), EPP is my favorite way to pass the time.

I always have a little EPP kit in my purse so that if I’m caught waiting at the doctor’s office, or getting my car inspected, or whatever, I always have a little something to keep me busy AND productive (I posted a list of my favorites at the end of this post). I hate wasting so much time on my phone when I could be sewing something, right!?

It’s such a convenient way to pack a little sewing kit and get things done when you otherwise couldn’t. I love the portability and convenience of EPP, and my daughter Gemma has even helped me finish a few stitches. You can see a ton of my Spellbound EPP shares by heading over to Instagram.

Continue reading Spellbound EPP – a magical quilt pattern
Posted on

Trippy Triangles Quilt pattern release

I’m stoked to finally introduce to you the Trippy Triangles Quilt pattern! This quilt has been a pet project of mine for the last year (and then some). From picking just the right fabrics–I changed my fabrics several times before I finally got with it stitching–to fussy cutting, etc. and I’ve loved every minute of it. I’m currently working on another version and planning yet another with some fun fussy cutting 🙂

The thing with EPP

Here’s the thing with English Paper Piecing: It’s an obsession of mine. Aside from longarm quilting (which I do almost all day), EPP is my favorite way to pass the time. I always have a little EPP kit in my purse so that if I’m caught waiting at the doctor’s office, or getting my car inspected, or whatever, I always have a little something to keep me busy AND productive. I hate wasting so much time on my phone when I could be sewing something, right!? It’s such a convenient way to pack a little sewing kit and get things done when you otherwise couldn’t.

Continue reading Trippy Triangles Quilt pattern release
Posted on

How to English Paper Piece – sewing pieces together

How to English paper piece

In this series of blog posts, I’ve talked about start up supplies (what my favorites are) and discussed glue basting (also my favorite). Now that you know how to prepare for sewing, lets get going! In this video, I’ll show you how I sew my paper pieces together once they’re basted. There are many, many ways to accomplish this. I’m showing my favorite methods, in case you haven’t seen them before, in the hopes of inspiring you to try new things!

There are different kinds of stitches you can use to sew the pieces together. My go to is a simple whip stitch, but I’ve heard people rave about the flat back stitch. I tried the flat back stitch, and it wasn’t for me–but you might love it (so def. check it out!).

how to english paper piece
Sewing the pieces together
Continue reading How to English Paper Piece – sewing pieces together
Posted on

How to glue baste – English paper piecing

how to glue baste

How to glue baste…

I know, I know. I know what you’re thinking. Why do I need to know how to glue baste?? So before we get into it…let me just say that I am not the authority on english paper piecing. There are so many ways to get a finished project, and I certainly don’t claim to be the one holding all the answers. But I want to let you in on what has worked so well for me after lots of trial and error. And before I go on, I just want to say: ALWAYS TEST NEW PRODUCTS LIKE GLUE STICKS ON YOUR FABRIC PRIOR TO USING THEM IN AN ENTIRE PROJECT. The glue I use has never done me wrong, but that’s not to say you might not have a different experience.

glue basting
Continue reading How to glue baste – English paper piecing
Posted on

English Paper Piecing – Getting started and basic supplies

english paper piecing supplies

If you’ve spent any amount of time on my blog or Instagram, you know by now that I LOVE sewing and quilting. SO much so that I like to have a travel-friendly project I can take with me, whether it’s in the car, waiting at the doctor’s office, taking my daughter to the dentist, etc., to help pass the time. While English paper piecing is fun, it is much slower than powering up your sewing machine and zipping through a few seams. There’s something meditative about it that helps the craziness of the world to fade away for just a moment and let you appreciate the thoughtfulness of a stitch. English paper piecing appealed to me first when I was still an ag teacher. A lot of times, I’d be on a school bus with kids and nothing to do for hours while we traveled to judging contest OR I’d be stuck in a hotel room at night, not able to go to sleep and wishing for something productive to do. So I started dabbling in EPP. My husband bought me the La Passacaglia kit (Pattern by Willyne Hammerstein) for my birthday and I was totally hooked. I want to take the time to share my favorite English Paper Piecing supplies and tips in the video below.

Continue reading English Paper Piecing – Getting started and basic supplies
Posted on 1 Comment

Typecast English Paper Piecing

Have you guys seen Sheri of Whole Circle Studio’s newest pattern? It’s called the Typecast of Characters, and it’s an amazingly fun English Paper Piecing pattern that lets you create the entire alphabet and customize it to your heart’s desire. You can snag your copy of the pattern guide and paper packs here.

Continue reading Typecast English Paper Piecing
Posted on

Wisecraft Handstitched English Paper Piecing Pillow

My finished English paper piecing pillow

After a long day at work, picking the kiddo up from daycare, fixing dinner and doing the dishes…I like to relax by doing English Paper Piecing.  I started my EPP journey before Gemma was born by sewing up La Passacaglia (pattern by Willyne Hammerstein).  I’d pick my fabrics in the morning before I went to work (this was when I was still teaching high school), then when I got home, I’d cut the fabrics out as quickly as I could, make dinner, etc., then start glue stick basting all the papers on the couch.  I’d organize all my rosettes into little zip lock baggies so I could just grab and go.  I also had color coded templates I made so I wouldn’t get my little papers confused.  I’d throw a prepped ziplock into my purse when I knew I’d be travelling with students and had some time alone at the hotel at night and sew when I had a chance.  That project really hooked me into EPP.

Fast forward to now…I sew full time and any extra time in the morning is spent prepping for the day’s work ahead.  Now I have a sweet & sour toddler who demands most of my extra time in the evenings, and I’m so wiped after she goes to bed that the last thing I want to do is think about anything.  That is…until I got Blair Stocker’s Wisecraft Quilts book.  It’s such an organically creative book about repurposing and it really pulls at my creative heartstrings.

Wise Craft Quilts
Wise Craft Quilts

There’s an EPP project in Blair’s book called “Handstitched” that made me fall in love with English Paper Piecing all over again.  It’s a project I was confident I could complete, even with my never ending checklist and a needy toddler.  If you’re so inclined, you can pick up a paper template kit from Blair’s website HERE.  (Full disclosure-none of these are affiliate links.  I don’t get anything out of you making a purchase other than the satisfaction of knowing you’ll love this project as much as I do!)  Below is a picture from Blair’s book of the project and my beginning planning phase of the EPP.  Anytime I do EPP, I always sketch out a “map” of the project with a key for what fabric goes where.  I can’t ever remember what my original plan is without writing it down!

Handstitched EPP planning

You can see in the finished/progress pictures that I didn’t end up using some of my fabric selections.  I’m a die hard Anna Maria Horner lover, and I ended up mainly using one print of hers that I’m a sucker for fussy cutting.  There’s so much going on in the pattern of that one fabric that you can basically fussy cut it all over and get dozens of different looks.

Handstitched step 1
Handstitched step 1

I started by assembling the center with my fussy cut pieces.

Handstitched step 2
Handstitched step 2

I absolutely LOVE incorporating stripes and straight lines into EPP.  I’m always surprised by the outcome.  See above.

Handstitched step 3
Handstitched step 3

There’s just something about those dull gold and maroons working with that magenta and mint that make them almost glow.

Spray basting onto my pillow front

So I decided this project would be a perfect throw pillow.  Once I started it, I knew I needed to see this EPP on a daily basis and not just hanging out in my sewing studio.  I grabbed my favorite spray baste and cut a pillow front a little larger than it needed to be finished so I could quilt it as well.  I used Chaco liner to mark the pillow front into quarters to easily find the center and centered the English Paper Piecing piece on the pillow front.  After I used just a smidge of spray baste, I hand appliqued it to the fabric (also AMH fabric-loominous).  All while sitting on my cozy couch with the husband 🙂

applique
Appliqueing the EPP to the pillow front

I used Wonderfil 100 wt. thread to hand stitch.  I quilted some simple straight lines on the pillow front to add a little texture.  The Loominous fabric already has a grid motif on it, so I only did straight lines one way to save me some time.

Quilting
Quilting


My finished EPP pillow

I could have just stitched up the project and made a mini out of it, but we’re a pillow household.  I love how you have to really look at the center to see the English Paper Piecing template shapes.  The stripes really break it up and make you have to search for it.  I’m really hoping to start another of these soon once I get some other projects off my plate because it is so enjoyable to sew.  I put a lot of thought and even auditioned some of the fabrics before I started sewing, but you could just as easily make a scrappy version that would look outstanding as well.  I believe Blair’s version in the book is all Liberty (insert all the heart-eyed emojis here!!!).

Basically, I love this project.  I can sit my fanny on the couch and relax while my fingers do all the work.  And it makes me still feel like I’m being productive (while not actually having to do anything strenuous).  Win-win, right!?

Posted on

English Paper Piecing – Double wedding ring style!

Good morning!  So many milestones going on in our household this week–our little girl turned 6 months last week (How has it already been half a year???) I celebrated my first mother’s day, started the baby on her first solid foods, and it’s my husband’s birthday this week.  Needless to say, it’s been super busy, and I feel like I’ve been to the grocery store almost every day this week.  Do they give frequent flier miles for multiple grocery store trips in one day?  I should also mention we live 12 miles from the nearest grocery store…  I’m sure you can relate to the feeling that you’re flying by the seat of your pants on household chores and checklists.  Laundry, dishes, etc., etc., but I wouldn’t trade it for the world!

One of the many reasons I love English Paper Piecing is the opportunity to slow down and enjoy the process of hand sewing.  I also love combining multiple parts of the sewing and design process and planning out a project from start to finish.  There is something so satisfying in making something completely from start to finish…even if it sometimes feels like you’re recreating the wheel.  


I started by sitting down with my EQ7 software and designing a mini quilt for our local Modern Quilt Guild.  We recently had our first silent auction event and mini quilt show (SO FUN!).  Then I printed templates onto cardstock for the EPP pieces and started thinking about my fabrics.  I had a great charm pack of Kaufman Kona Cotton Solids that I had been holding onto for over a year, and thought this would be a great opportunity to use it.  I traced and cut out my fabrics, and then had to pause when I selected my background fabric. 


I knew I didn’t want white, and I really like the effect black and white patterned fabrics have with solids.  So I auditioned a few different fabric choices–I really thought I wanted to go with a black and white stripe, but I opted for a more solid-reading print instead.  I pieced together a few of the DWR pieces and then placed them on top of my background fabric choices.  Pictured below is what I thought I was going to go with, but I instead selected a Tula Pink True Colors black and white print.  Because…Tula!!!


From the basic design in EQ7 (They already have the blocks drawn up…I just sized them to fit my needs), printing the cardstock, then cutting the fabrics, I got to take a breath and piece in my leisure time.  HA.  Leisure time…You know what I mean.  The semi-quiet moments in the house when my hair wasn’t on fire 😉


Then I loaded the mini on my longarm and did some simple stitch in the ditch around the wedding rings and some loopy swirl combos on the black and white background that blend nicely.  It may seem kind of dumb to longarm a mini quilt, since you need a little bit more backing fabric than you would if you were to quilt it on a domestic, but I figured I paid for that huge machine and I’m going to get my money’s worth!  Plus, I had just taken a fresh quilt off of the frame, and I had to take advantage of it before I loaded my next quilt.  It made for a slightly quicker finish than if I’d done it on the domestic sewing machine.

I was thrilled with the results, and playing with the color gradation and high-contrast background was really a lot of fun.  But mostly, I was able to really enjoy the process and each step along the way.  I don’t know about you, but from the day I started sewing, I’ve always eyed the double wedding ring quilts.  I’m not sure I have the patience at this point in my life to see a full-sized quilt through, so this mini quilt was the perfect opportunity for me to cross a DWR quilt off my quilting bucket list.  I had also never taken the time to hand piece curves before, but it wasn’t as bad as I thought it might be.  Really, I had built it up to be this super scary moment, when all you really need to do is take a little extra time and carefully mark the centers of each EPP piece prior to piecing it, and make sure you line the centers up while adjusting the curves.  

I hope your sewing adventures take you somewhere awesome this week, and try to slow down and enjoy the process behind what you’re doing.  I know I really enjoy the projects where I can slow down a bit and take a break from the hustle and bustle of life.  Happy sewing friends!