Posted on

Divination EPP Quilt Pattern

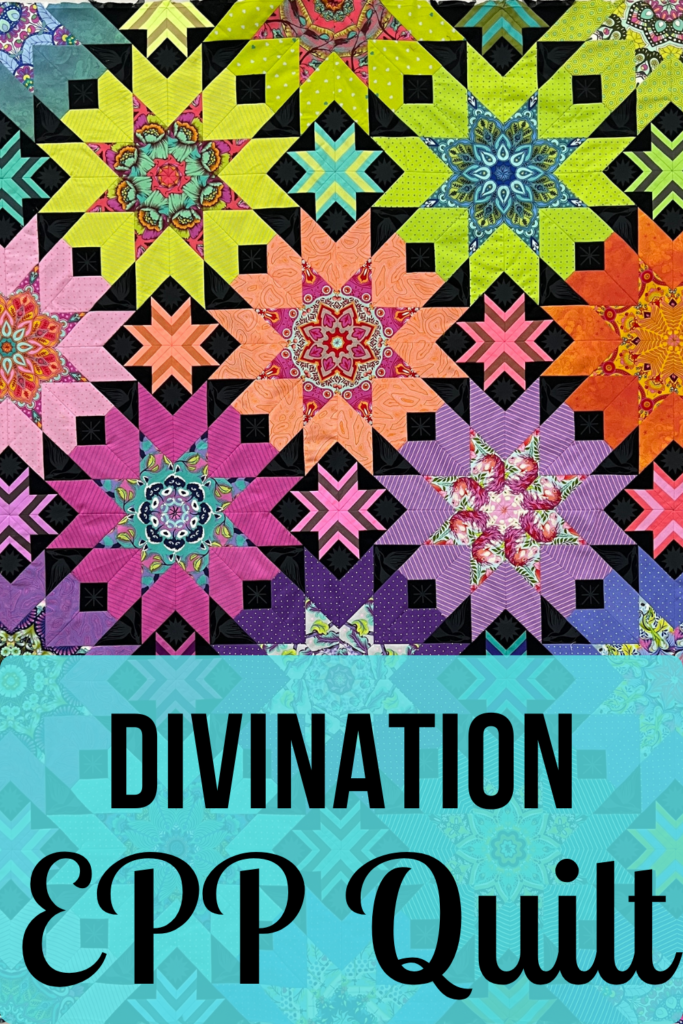
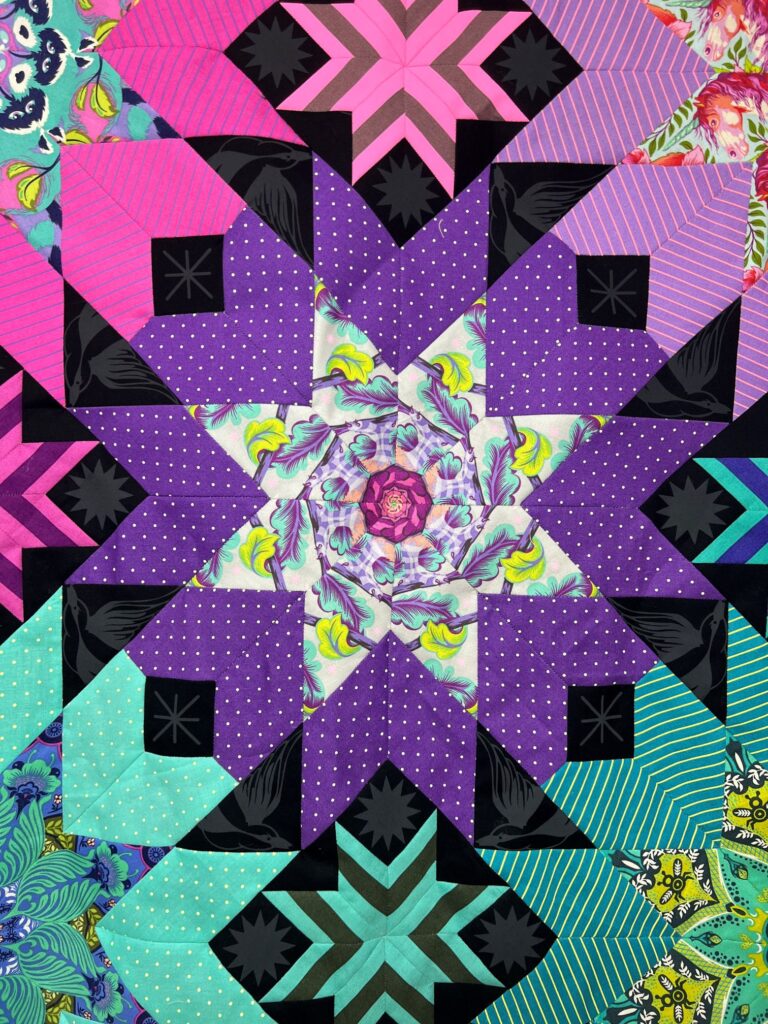
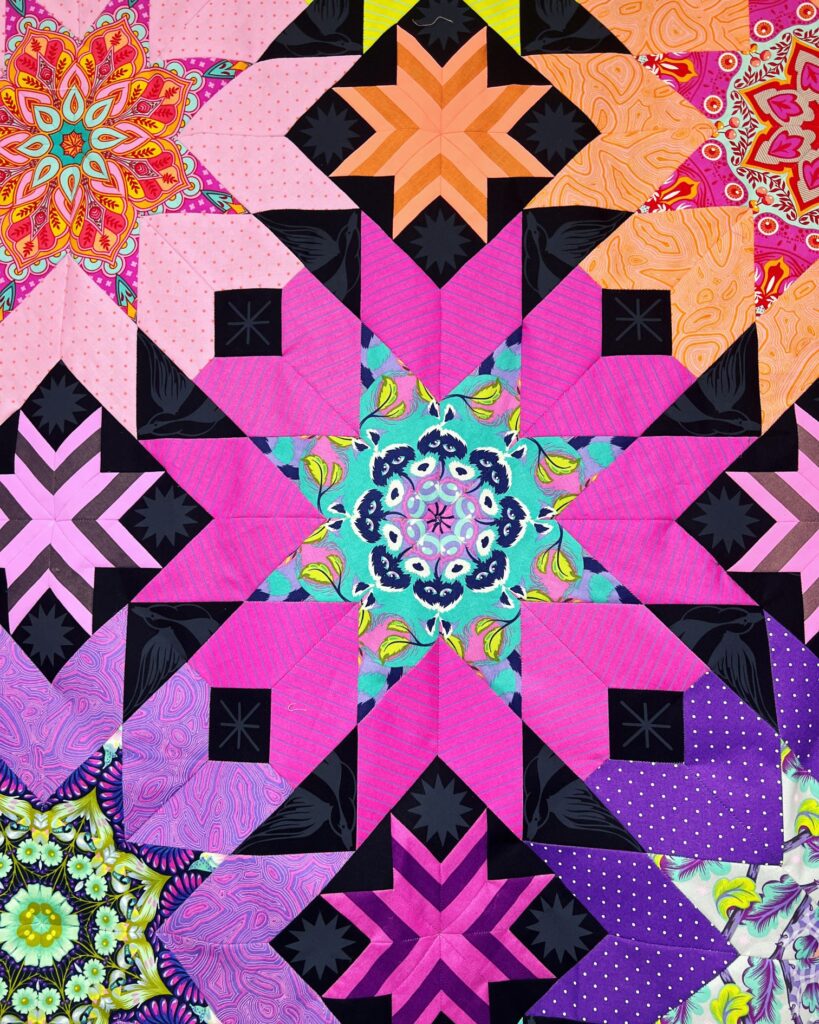
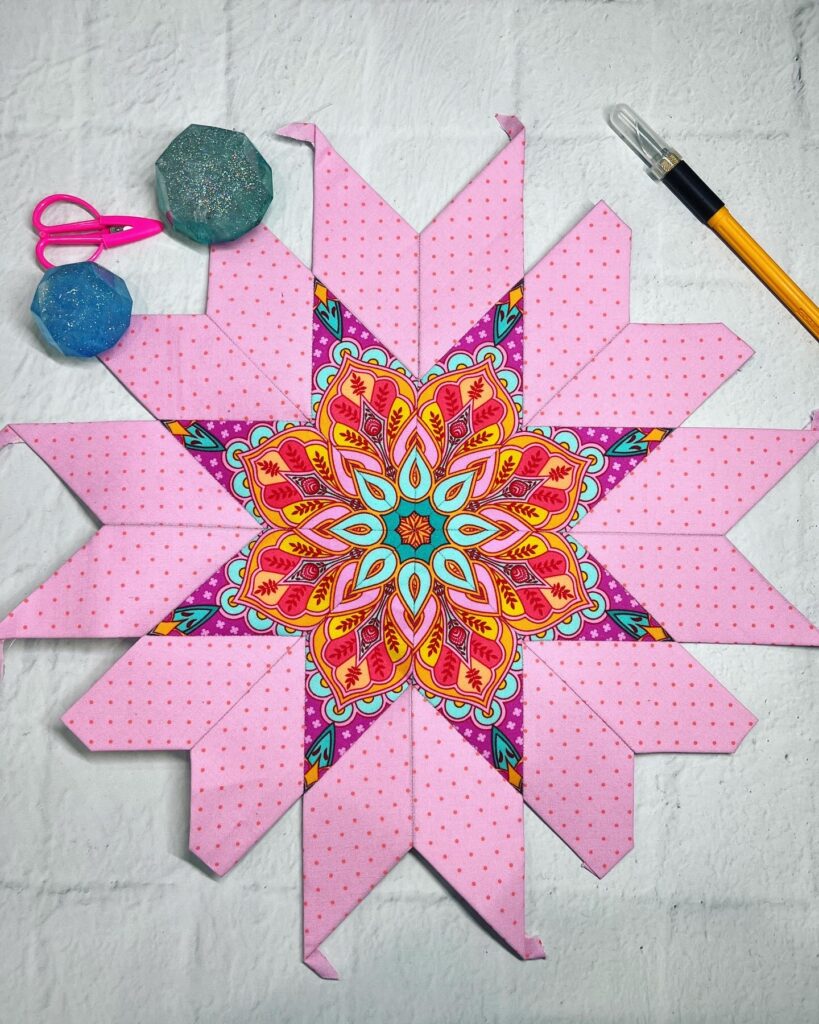
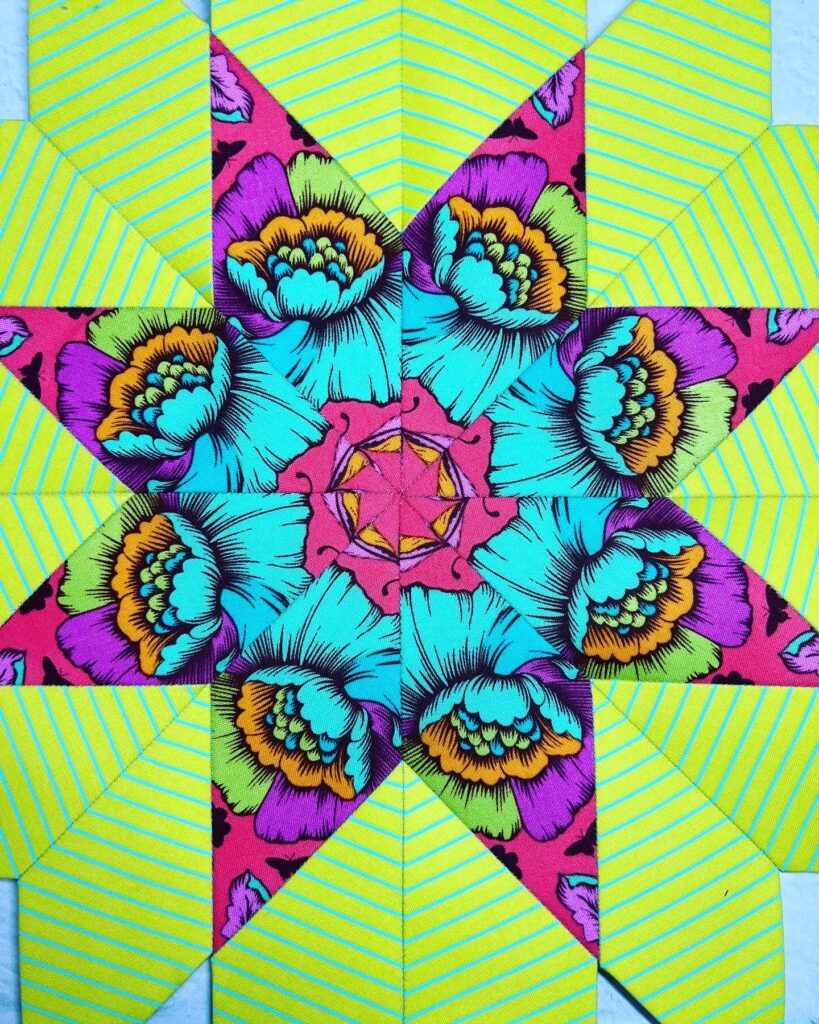
I’m so thrilled to finally have my Divination EPP quilt pattern out in the world! I am such a huge fan of 8-pointed stars that I knew I wanted my next pattern to be composed primarily of that shape. English paper piecing is such a wonderfully fun past time, and I really had so much fun picking fabrics and fussy cutting each of these blocks. This pattern looks deceptively intricate, but each fussy cut print is paired with a “blender” fabric that reads as a solid, so it simplifies the fabric selection quite a bit. It’s a great confident beginner project for those familiar with EPP, but not ready to pair complex fabrics together for each and every block.

I have been looking at my out of print fabric stash for quite a while now, and I LOVE using that fabric up. I want to use up every crumb and enjoy those fabrics in quilts and usable projects. The Divination EPP Quilt is a great way to use up those long hoarded fabrics without regret.

Many of these prints are so fun to fussy cut, especially with the help of Magic Mirrors to show you a preview of what the kaleidoscope effect will look like BEFORE you do the cutting! You can see each and every block I’ve cut for my Divination EPP Quilt by heading over to Instagram. You can search the hashtag #DivinationEPP to see the awesome blocks!

  • Clear instructions and fabric requirements (calculated in solids, but also includes a supplement with an exact diagram with specific fabrics used in the cover quilt and requirements for those fabrics))
  • Coloring page to help plan your quilt
  • Yardage requirements that aren’t usually included in EPP patterns
  • Step-by-Step instructions with pictures to guide you through
  • Instructions and diagrams for piecing quilt backs
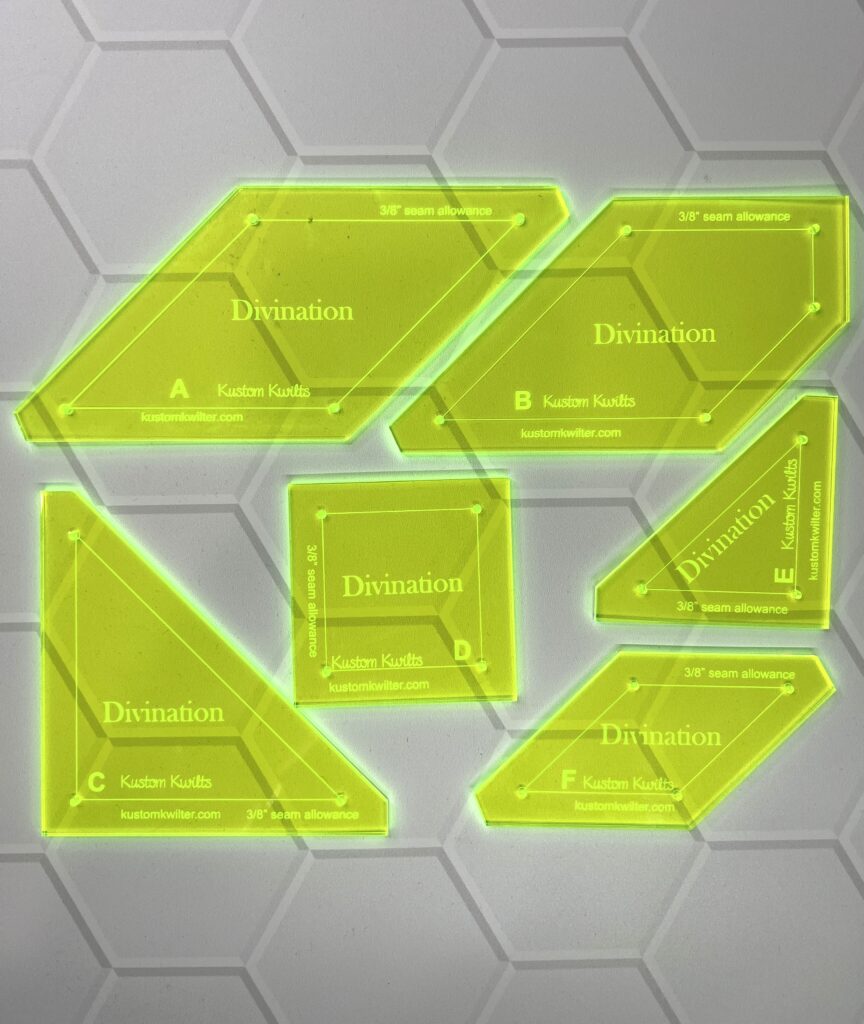
  • Pattern includes printable templates for easy cutting
  • The option to purchase acrylic templates, making fussy cutting a breeze
  • Basting diagram so your seams spin and nest perfectly
  • Printable fussy cutting templates (this is especially useful if you are overseas and want to avoid shipping acrylic templates)
  • Fussy cutting diagram to illustrate exactly how to cut the Tiny Stripes prints
  • Fussy cutting diagram to illustrate exactly how to cut the striped stars, along with alternative layout
  • Options to make THREE different sizes
  • Expanded size assembly layouts for the 61″ x 82″ and 82″ square larger quilt options
  • Printable papers

Fabric Kits

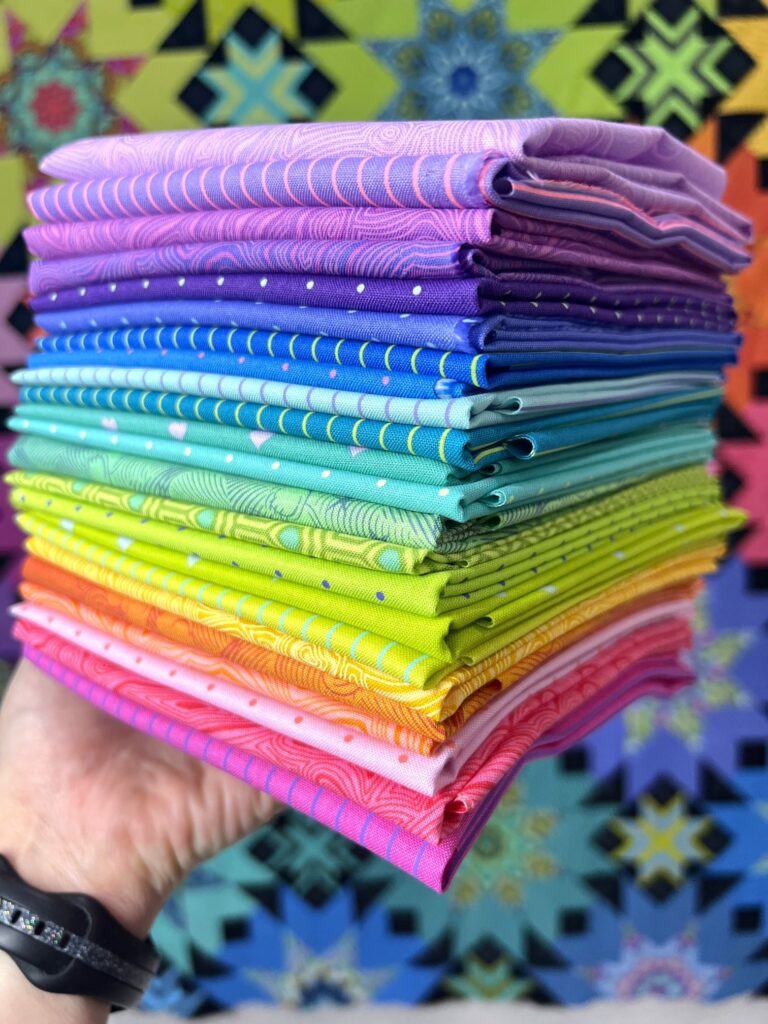
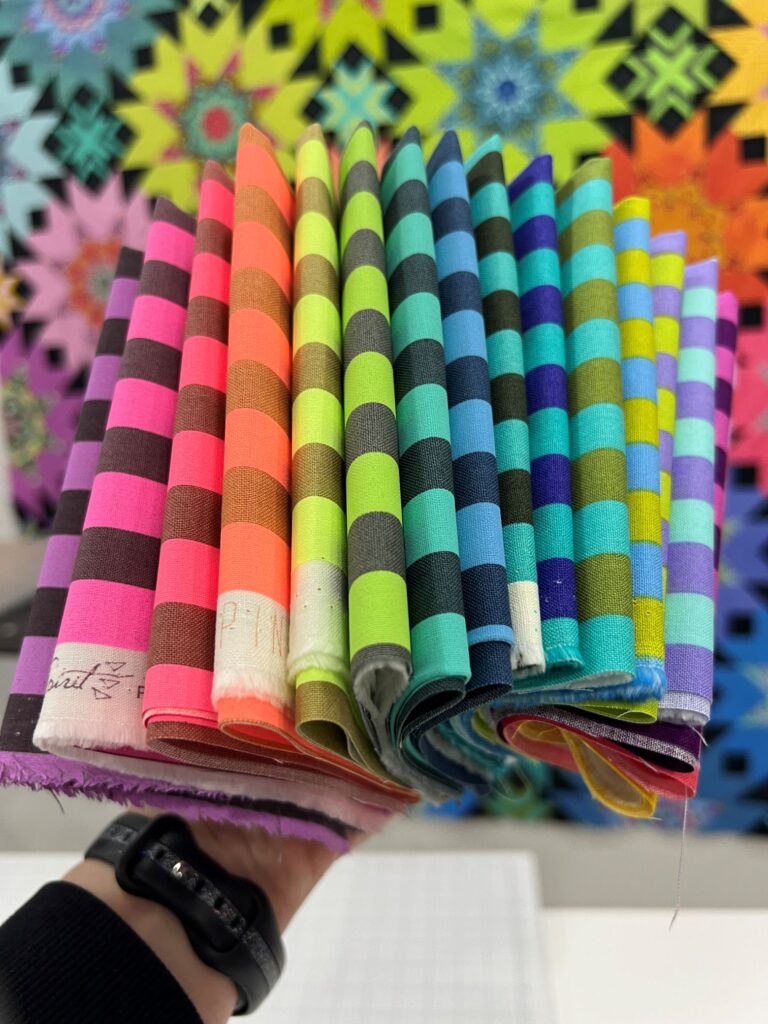
You can purchase a stripe bundle that will get you going on all of those smaller starbursts here. And you can get Ultimate Tula Pink Rainbow bundles here to coordinate with each fussy cut star in the top.

Fussy Cutting? What’s that?

Divination Fussy cutting acrylic templates

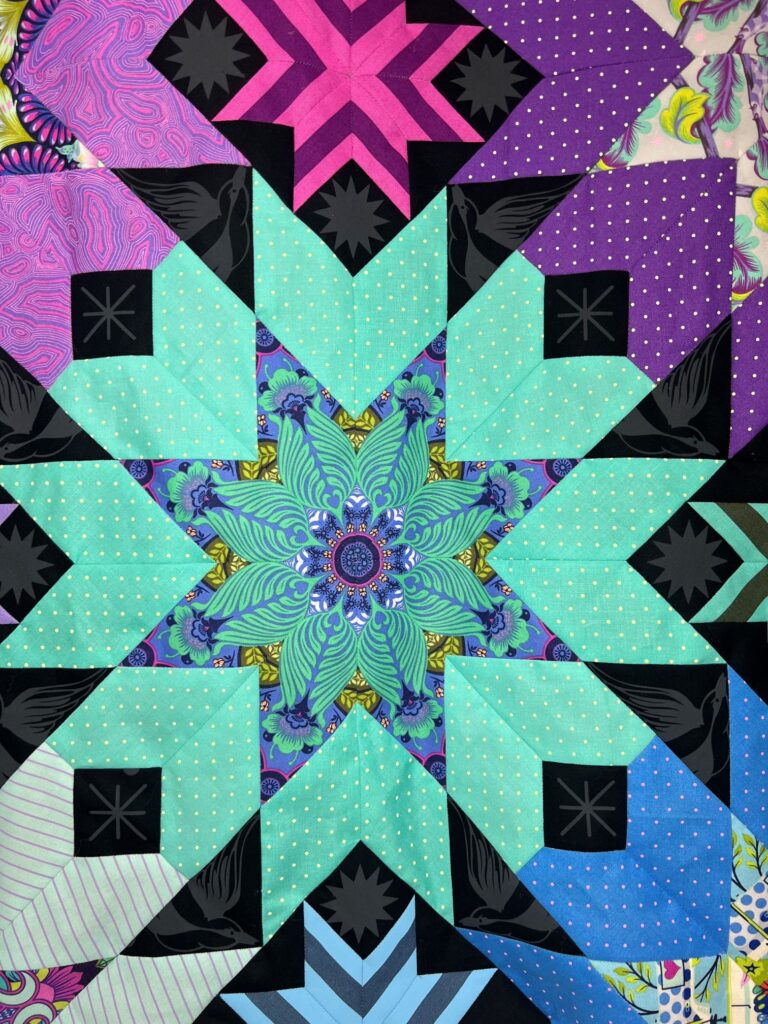
Fussy cutting is one of my favorite things to do. And the Divination EPP pattern is made for fussy cutting! You basically take a fabric and look at the print on it. You decide what part of the print you want to show in your piecing and determine where your seam allowance will fall. A great way to look at this is with a set of Magic Mirrors to show how the pattern will repeat if you cut so many of the same print. I like to place the Magic Mirrors directly on top of the seam line of my fussy cutting template (that way, the angle is perfect) and move them on top of the fabric to see the different possibilities for fussy cutting.

Fussy cutting preview with mirrors

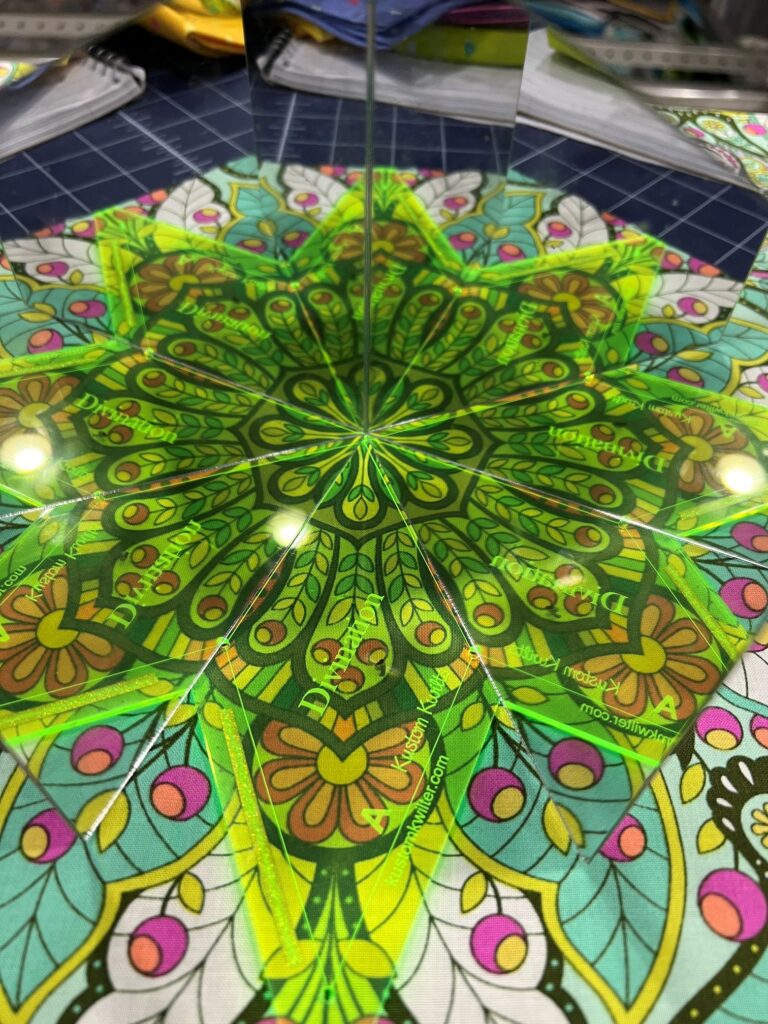
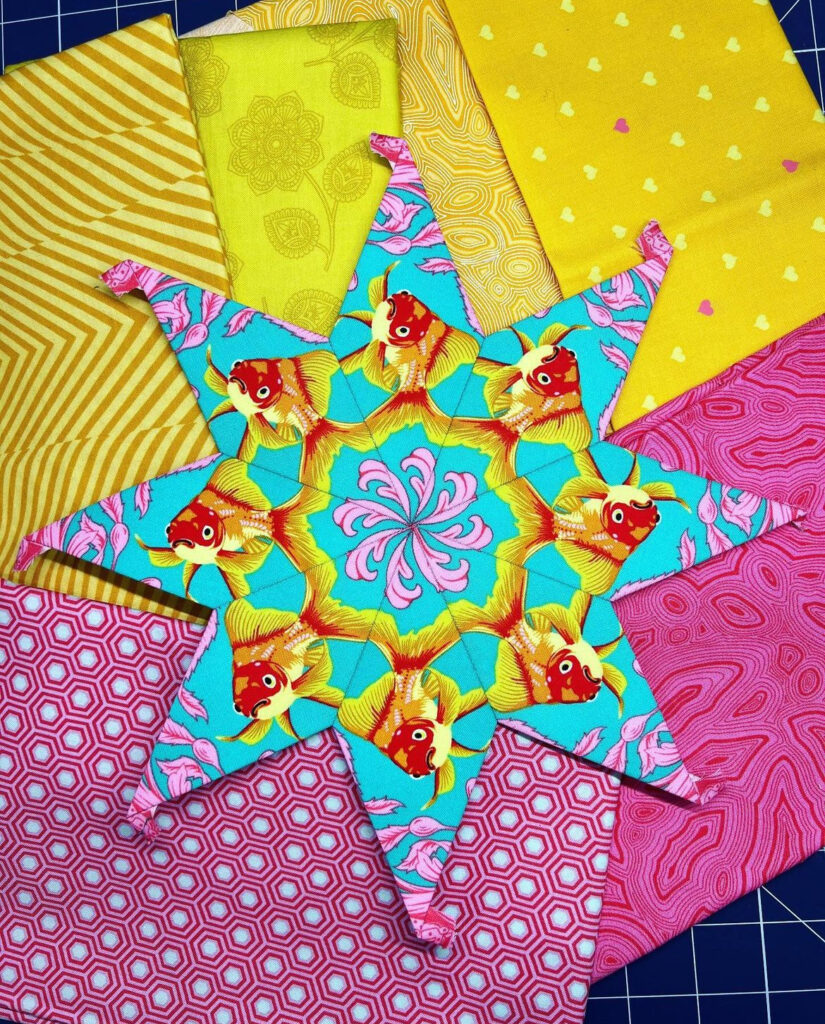
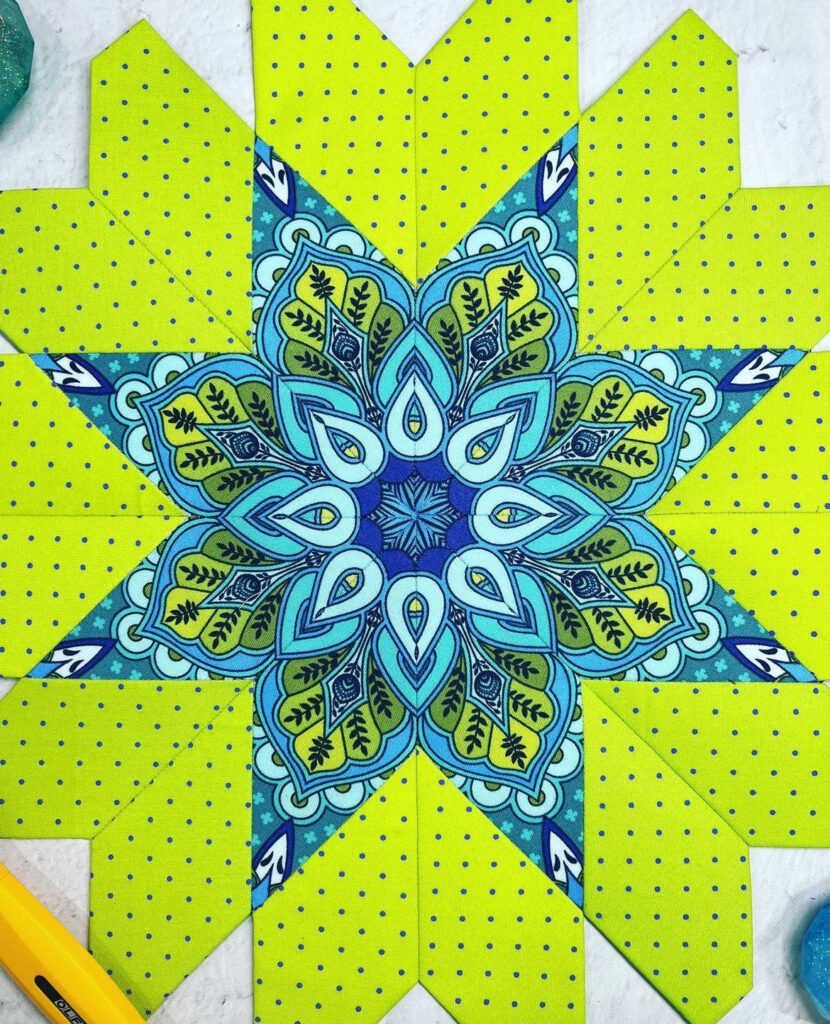
Once you decide on the area of the print that you like, you use the acrylic templates to fussy cut the print so it creates a new and unique repeat. Half the fun is turning the pieces in opposite directions to see how much of a difference you can get from one print! Below are some great samples of fussy cutting turned into Divination EPP blocks.

New to English Paper Piecing?

That’s okay too. I’ve got you covered with a basic EPP video where I tell you about all my favorite tools, tips, and tricks for getting started with EPP. I’ve also got one on my favorite basting method â€“I’m team glue basting all the way. There are tons of different supplies, methods, etc. and every single EPP-er seems to have some pretty strong opinions about which method and what supplies they prefer. English paper piecing is a fun way to take a project with you, and I invite you to explore the different methods and find the one that you like the best!

My favorite English Paper Piecing Accessories

Posted on 3 Comments

Janome Education Summit

Janome Education Summit 2018

This past week was one I’ll never forget.  I was invited to attend the first Janome Education Summit in Park Ridge, New Jersey to meet some amazing people and learn some awesome new things about what Janome has coming up!  The Janome Education Summit consisted of Janome Educators, Artisans, and Makers–generally a group of the most amazing people, packed with three days of classes and collaboration.

It had been about 7 years since I had flown anywhere, and I was REALLY nervous about getting on a plane and leaving my 1.5 year old, but once I made it to NJ, I was SO excited to be there!  I’ve been working with the amazing people at Janome America for almost three years now, and had never really gotten the chance to visit with them for longer than 5 minutes.  We had a nice meet and greet to kick off the first night there, and the opening remarks were made by Janome’s new National Spokesperson-Kimberly Einmo.

Kimberly taught a great class showing us the HP foot and needle plate for the MC 9400 and we made a really cool block using her Flying Geese ruler (it virtually eliminates ALL waste) and a design roll of her new Solid-ish line of fabrics.  If you’ve never taken a class with Kimberly, I highly recommend it.  She is so inspiring and has such a genuinely fun personality!

Professional HP Foot

I’ve been using the Quarter inch foot for precision sewing on my MC9400 and had never thought to try the HP foot and needle plate.  Total game changer!!!  If I thought my seams were accurate before, this foot is even more precise.

Janome Education Summit
My finished block from Kimberly’s class using Solid-ish

Amy Johnson of Amy’s Quilting Adventures demonstrated a set of rulers for ruler work on the domestic sewing machine.  Amy provided all of the attendees with a printed piece of fabric to practice our ruler work on.  I had never tried to use rulers (except maybe a straight edge) on a domestic sewing machine, but these rulers from Janome are so versatile and fun to work with.  Here’s a picture I took of Amy’s sample quilt she quilted–and it’s AMAZING!!!

Amy Johnson's sampler quilt
Amy Johnson’s sampler quilt

And this is my very first try at ruler work on the MC9400–it’s definitely one of those things you have to practice a few times.  And some tools that would be good to have on hand–grab a Supreme Slider for the bed of the machine and some quilting gloves to keep your rulers from sliding.

Practicing Ruler work on the Janome MC9400

The second night at the Janome Education Summit, we had a pajama party and worked on some of our group quilt blocks that each attendee designed and brought with them to the summit.  We were also treated to Liz Thompson (Janome Canada) showing off the awesome quilt binder attachment to save time and fabric when binding quilts!

Liz teaching us about the quilt binder attachment

Liz has the best sense of humor and is such a fun person to chat with!  I can’t wait to start using the quilt binder–you only have to sew the binding down once–no stitch and flip to do the other side!

On the second day of Janome Education Summit, Sheryl and Rachel from Shannon Fabrics brought us some delightful Shannon Cuddle and Embrace blanket kits.  They shared some super soft fabrics with us and walked us through a blanket pattern that seemed like it would take all day–but we finished them in under 2 hours with the quilt as you go method!

Rachel and Sheryl from Shannon Fabrics

Putting the cuddle binding on my blanket

My daughter already claimed the blanket I made–I selected a kit in bright turquoise and teal with grey accents in double gauze and cuddle, and Gemma promptly ripped it away from me as soon as I got home 🙂

Eileen Roche from DIME (Designs in Machine Embroidery) shared with us her amazing software to customize our own fabrics called My Fabric Designs–and it’s so much fun to play with.  I already have plans to create some custom fabrics for some bag linings to include my logo and colors–and there are so many fabric substrates!

We were also treated to a lesson in the Acusketch app from Janome by Tamara Kate (a Michael Miller Fabrics Designer).  Tamara is so talented and her fabrics and quilts are absolutely gorgeous!  I was blown away by what the app is capable of, but you can make drawings within the app and transfer them to the MC15000 to be embroidered on your fabric.  Essentially, you could have your child draw something special and have it forever preserved as an embroidery design (that’s what came to my mind when I was playing with it–but of course it could be utilized in countless other ways!)

Tamara Kate Designs
Tamara Kate Designs

The Janome America team surprised all of the attendees with a dinner cruise on the Hudson River, touring New York City.  The weather was wonderful and the sunset was just breathtaking.

Dinner Cruise in NYC

NYC at sunset
NYC at sunset

To wrap up our final day at the Janome Education Summit, our last class was led by Heather Peterson of Girl Charlee to make a quick and elegant pencil skirt with Janome sergers and coverstitch machines.  Heather shared all of the knit substrates offered on the site (holy cow, there are a LOT!), and provided each attendee with a pencil skirt kit.  I thought there was no way we could go from start to finish in under two hours and have a completed skirt, but we did!  We also got a sneak peek and got to use the new Janome serger that will be out shortly–I was squealing with delight!

Heather Peterson, Girl Charlee

I selected a super cute blue floral knit from the kits Heather brought for us, and it turned out so cute!  Trish from Trish Stitched posed for a quick picture with me with our finished skirts 🙂

Our Girl Charlee pencil skirts

Every moment of the Janome Education Summit was jam packed with great information that I can’t wait to share with you in future posts.  I can’t believe I almost forgot to mention the swag bag–I literally had to fill an entire suitcase with nothing but goodies from all the sponsors and contributors (A huge thank you to all the sponsors!!!).  I think the plane flying me home was struggling with that extra load!  There were so many talented Educators, Artisans, and Makers in attendance, and each person has so many inspiring things to show with their Janome sewing machines!  Thank you so much to Janome America for hosting such a wonderful and inspiring event.

Posted on

Working with baby :)

Good morning!  I’m going to take a brief pause from the regularly scheduled program to be real for a minute…and fair warning…there is not much sewing talk in this blog post.  I want to talk about running a business while taking care of a baby.  

My husband and I are both SO extremely blessed to be able to work from home.  However, he does have to travel some.  Which means our usual schedule of passing the baby off to one another takes a break and I’m full time care giver for a short period of time.  Which is AWESOME.  There’s some sarcasm in that comment, but there is also 100% truth.  As I type this, I can hear my little girl baby talking through the baby monitor that’s perched a foot from me at all times when she isn’t on me.  I never thought I would say this, but it is music to my ears.  And while I may not get all 50 tasks on my daily to do list completed in 24 hours, I’m fine with dragging the incomplete tasks to the top of my list for the next day.  

I was very naive in thinking running a quilting business AND being daycare manager to my little one would be a piece of cake.  There are times when it’s trying and I’m not sure I’m going to make the deadlines I set for myself, but it always seems to work out.  I’m no expert in time management, but I’d like to share some of the things I’ve implemented to still be able to work a minimum of a 40 hour work week.

1.  Wake up at 3:30-4:00 AM…Luckily, (for now, anyway) baby girl sleeps in until 9:30.  That gives me about 5 hours of UNINTERUPTED work time.  Granted, I can’t always leave the house and walk out to the studio, but I can brainstorm and plan for upcoming projects, write invoices, and calculate estimates for customers.  

2.  NEVER sleep when the baby sleeps…If I got one piece of advice over and over again before and after I had this sweet baby, it was “Sleep when the baby sleeps”.  I will say, I don’t enjoy naps.  I lay there, thinking about how much time I am wasting not falling asleep and run through my list of things I could be getting done, instead of getting some shut-eye.  I try to make the most of every tiny nap she takes and bust my hump to get some quality work done.  And I can honestly say that was the worst advice I was given (that’s saying something!)

3.  Basically, it’s just more of one and two.  Early bed time for baby means more work time for me.  For some reason, I thought I had all these great tips on how to run a business and be a stay at home mom, but all it boils down to is making the most of your time while the baby doesn’t need you.  Also, don’t waste time on inconsequential tasks (IE makeup 😉 .  Unless there are appointments with real people that day.  Then, don’t skimp!

And finally, what do I really know???  My sweet little angel is only 4 months old.  I’m sure someone is reading this, shaking their head, and saying…well wait another week and we’ll see how that works out for you.  

So I’m going to end with…this parenting gig is much harder than anyone could ever explain.  And the hard work really hasn’t started for us.  So here’s to muscling through…and why do I want to add an emoji to every sentence I type (insert eye rolling emoji here)…?  Have a great week and hopefully I’ll have some sewing goodness to share next week!

Posted on

I left my REAL job to quilt! My two cents…

Up until this past June, I was a full time teacher for 9 years (or all of my professional career, post college).  I’m not going to give you an earful about my experiences, but I will tell you that I taught agriculture science and was the FFA sponsor.  Also, not going into the details of that…I could talk for hours about what that job entails.  But I’m not going to.  

I am going to say that I think teachers are not supported in what they do (by lots of people).  I’m not going to be specific, but I will say that it only took 9 short years for me to become burned out.  In a job that I originally thought I would never tire of.  I loved my kids.  I loved them so much that I called them MY kids.  Years after they graduate, I still have many contact me around the holidays, when they are home from the military or just texting me to say hi (When you’re an FFA sponsor-all the kids have your phone number in case of emergencies with their livestock projects).  I’ve cried over sadness my kids have suffered, prayed for them, been happy with their successes, and some of them have impacted my life in ways that I can’t begin to describe.  I think there truly is no other profession where you become so invested in the lives of other people’s children that you are emotionally torn to shreds over decisions to move, accept another job, or leave the classroom entirely.  (With FFA, you keep the same kids all 4 years of high school.)

That being said, I also think there are few careers where a person (in this pay grade) is criticized so much.  And called/texted at all hours of the day, night, and in between.  The expectation is that you are 100% devoted to that job 100% of the time.  Or that’s how I felt, at least.    

I made the decision to leave teaching (for now, at least) because I was truly unhappy.  I stuck it out for roughly 2.5 years of being unhappy.  I know that being happy isn’t everything, but I think your job shouldn’t make a miserable, bitter person out of you.  The only times I felt happy was when I was with family or when I was sewing.  I’m not going to talk about the MANY factors of what made me unhappy, but there was a limitless supply.  I did still love the kids, and that was one of the few reasons I stayed.  This post was originally going to be about what I do now-the custom sewing for others, longarm quilting, creating, making, etc. but I feel like that almost cheapens the decision I made to leave the classroom.  When I’m alone in my sewing room with the machines humming around me, or the music turned up as loud as it will go, my mind will frequently travel to the kids I spent so much time with.  I wonder about the choices they are making on a daily basis, if I even made any difference being with them in the classroom, and I hope for them and their futures.  I think about all the hardships those kids endured through high school, losing loved ones, being mistreated by parents, and all the other hard things kids go through.    

I don’t really know where I was going with this, just felt the need to get this off my chest.  And most days when I’m walking the short 20 yard walk to my sewing room to go to work, I have a smile on my face.  I’m not a miserable person to come home to anymore.  I’m able to spend quality time with my family.  I know that for now, I’ve made the right decision.  Just my two cents.  

Posted on

The legacy of my Mamaw

About a month ago, my last living grandparent passed away.  She was 95 years old, and I called her “Mamaw”.  

F. Brownfield, 1920-2015


From as far back as I can remember, my Mamaw has been my creative encourager.  She was a painter and loved painting scenes of the Texas Hill Country and most of all, blue bonnets.  She did gorgeous oil paintings, water colors, and acrylics, and even dabbled  in some mixed media.  

Even though my Mamaw was primarily a painter, she was an amazing crafty person and sewist.  She could look at an outfit in a store and draft her own pattern and make something that looked even better.  When I would get to visit her, she would take me to museums and would set me up in her painting and sewing room with art supplies.  It makes me a little sad that I didn’t realize what an asset she was to me at the time and that I didn’t ask for her to teach me.  I did really enjoy every moment spent with my Mamaw, and I know I didn’t take it for granted that I had her in my life.  

She inspired me to take art classes at a young age and had such a determination about life that I only hope I have some of that in me.  

I can only hope that I live to 95.  My Mamaw had an amazing life and traveled and loved and lived well.  Before my Papaw had passed, my Mamaw affectionately called him her “Cutie-cute”.  My family and I attended the memorial service last month, and I hadn’t prepared myself to start going through her personal things, but that’s what had to be done.  It’s really weird to think that once your life ends, the pieces left behind are just an echo of yourself–purchases you made, things you planned to finish, books you read…It happened that I am the only person with an interest in sewing/quilting in our family.  As a result, I ended up taking home my Mamaw’s sewing machines.  I don’t really plan to ever use them, but just having them around me is comforting.  To have items that a loved one used to create things and see them every day is a sweet reminder of what my Mamaw means to me.  I had so many cute little outfits when I was younger that she had made me on those sewing machines.  Even though we had an idea that the end might be in sight for her, it didn’t prepare me for the loss I felt when she passed.  I guess having some of these things, along with patterns that her handwriting is on comforts me in a small way.  

I’m not sure that Mamaw ever used this machine a lot…she also had a Necchi and a Kenmore that were probably around 80’s models.  I believe this is a 1947 model featherweight, based off of the serial number.  

And then some of the books that she had written in out to the side…you can obviously tell this is totally in style right now 😉

I know that my Mamaw left a huge legacy and I hope that my life has as much meaning as hers does.  The impact she had on so many people and the artwork she created will inspire future generations.  Maybe one day I’ll have a daughter (or son) who will have the creative bug and appreciate some of the things she created as much as I do.  My second cousin presented Mamaw’s eulogy at the memorial, and described Mamaw as “a tough broad”, which couldn’t be more true.  From losing both of her parents at a young age, weathering the storm of the great depression, raising a family, going back to school to get her bachelors degree and become a teacher, travelling the world, there were many things she overcame and had a can-do attitude about everything.  She didn’t dwell on things that she couldn’t change, and she worked to change the things she could.  I feel lucky that she was my grandma, and even though saying goodbye is hard, I know she’s in heaven with my Papaw…he’s fishing and she’s painting up a storm.  


Posted on

My first quilt market

International Quilt Market Website
Visit the link above for credential requirements, hotels. dates, etc.  

My first longarm purchase at Quilt Market


I would consider myself fairly new to the sewing/quilting industry, especially compared to others who were brought up around sewing and related activities.  I’m in my 4th year of sewing/quilting/etc., and hadn’t really considered attending quilt market or quilt festival until this year.  

I still have never gone to festival-the portion that is open to the general public-but I did get to go to market this year.  It just made sense that I needed to go and try to network or build some mutually beneficial relationships with other people in the industry.

Here are some tips for those of you who are first time visitors to Quilt Market:

1.  Have a plan-for maps, routes, restaurants, lodging, parking.

     I used to live in Houston, so I didn’t worry too much about maps, restaurants, lodging.  But all of those things are extremely important.  On my first trip to QuiltCon, my hotel room was miles from the convention center, and I learned not to make that mistake again.  Most of the fun, after-hours things take place at the center of it all, and if you aren’t staying close to the convention center, you probably will miss out–or at least spend more time driving back and forth than you’d like.  If it isn’t an area you’re familiar with, take advantage of the local restaurants and partake of the awesome food.  Parking is extremely important!!!  This year, the George R. Brown had lots of construction.  And it’s downtown.  I made sure my hotel had guaranteed parking reserved at no additional cost, and I was able to walk to the convention center.  Otherwise, you will be looking at mandatory valet fees, or at the very least–valet/parking fees just to park at your hotel.  I find it somewhat ironic that when I lived in Houston, I had no interest in attending Quilt market or festival.  

2.  Have a plan-contacts & exhibits:

      I printed out the map of the convention floor and the list of exhibitors.  I went through and hi-lighted every booth/exhibitor I thought I may want to visit with so I didn’t waste time walking aimlessly through the whole thing.  It also made it really simple for me to remember what my goals were.  I really, really wanted to meet Tula Pink…that was my first destination 🙂

Tula meet up 🙂


3.  Register in advance.  Make sure you have all the required documentation–and if you don’t, leave yourself plenty of time to get those things in order.

4.  Reserve your hotel WAY in advance.

      Especially if you want to get a special rate for market.  Most of those rooms that are blocked out book up quickly, and the hotels with rooms adjacent to convention usually fill up also.  Just plan ahead.  

5.  Business cards.  

      Memorable, simple, all your contact info.  I printed up fresh ones from Vista Print that really were just my name in huge letters with small contact info.  No flowery add ons.  Just simple and bold.  You may want something different, but I wanted mine to be versatile since I planned on talking to several different people.  

I also got to meet Lindsey Marsh from Sew To Grow.  We have the same last name, so we’re holding up business cards/badges.


6.  Know what your goals are.

      In my case, my two main goals were networking and purchasing a longarm (which I will discuss in a separate post).  I wanted to try every longarm that was represented at market, and I did that.  I took notes on every machine and what I liked and didn’t like, price points, etc.  I was able to make a decision in 24 hours and make the purchase.  I will say I was a little nervous at the networking…I didn’t do as much as I should have, and I will know what to do more next year when I attend.  I wasn’t prepared.  When I went to people who’s work I admire so much, I couldn’t manage to find my speech and ended up sounding like a doofus.  I didn’t have clearly defined in my head specific things I could do to benefit some of the people I wanted to network with, and so was at a loss when I went to talk to them.    

7.  Make sure you have enough time to meet your goals.
   
      I only had about a day and a half to get everything done that I needed to.  Don’t over do it, and make sure you make the most of your time.  

8.  If you go for networking purposes:
    
      DON’T interrupt an exhibitor who is trying to sell their goods.  If you are solely going for an introduction, wait until that exhibitor is not busy–I would recommend at the opening or closing times of market, or on Sunday evening–to introduce yourself.  You won’t make any friends cutting off a potential sale for that person.  The exhibitors are there to make sales to retailers.  If you are trying to get work from designers, make something from their fabric, or products that you can wear to show you use it already.

9.  Take a notebook and something to put business cards in

      You will want to have something handy to write down notes or contact info from other people, and somewhere handy to keep business cards you’ve exchanged.

10.  Networking follow-up:

        If you go to make business relationships, you should send a follow-up email after market and festival are over.  This shows that you are serious about what was discussed, and that you really want to work with said person.  Do it in a timely manner so the person still remembers you.  It doesn’t have to be anything fancy, but you should at the very least remind them what was discussed, how you can help them business-wise, and your contact info again.  If you have a photo gallery on your website, also include a link to that so they can see your work.  

11.  Have fun and appreciate the hard work that goes into it!

Until Next time,
Joanna

Posted on

I wish I may, I wish I might…Part 2

As promised, I’m continuing the story of our shop journey.  You’ll have to forgive me, but I’m choosing to tell you through pictures more than writing, this go around.   These pictures probably range from 2-4 months, and were in the hottest part of the summer.  The last picture in this post shows the part most important to me–my framed sewing room!!!  I’ll update more as we get more finished, but for now, there is a little more progress done than is shown in that last picture.  All that is really left is finishing the drywall, painting, installing lights and electrical outlets.  We also wanted to do a really cool epoxy on the floor, but still kicking around ideas for that.  

Brady and our brother-in-law Scott

When I posted this picture on social media, lots of people thought
these were rolls of batting, and not insulation 😉

Insulation is up and starting on the walls
The exterior of the mostly finished shop
This is the beginning of my little framed sewing room.  
Pretty much after day one of working on it
(Brady and his dad)

Posted on

I wish I may, I wish I might…

Have the sewing room I dream of TONIGHT!  Not really.  I wish is right.  Soon enough, though.

If you’ve read my previous post about painting over tacky wall paper, then you know my husband and I live in a pretty budget friendly house (that’s code for–NO ROOM for anything).  So, a little over a year ago, we started building our dream workshop to house our hobbies.  Brady drew up a big metal building and then we planned to frame off 1/4 of it on the interior to make that my sewing/quilting “studio”.  My awesome father-in-law got involved and literally has done more than my husband and I combined.  

The shop is basically done, and Brady has been working on my sewing room for the last 6 months.  

 This was the first picture I took of when we 
were prepping the foundation.  
After our huge delivery of fill dirt–I think it 
was something like 9 truck loads full.
After spreading the fill dirt…

I really don’t remember what this step was. 
 Something about keeping moisture in with the plastic…

And then, the magical day when the concrete was poured!
I wish I could go back in time and tell myself we were no
where near close to being done, like I thought we were…


My father-in-law, brother-in-law, and husband worked 
on putting the beams up for the building.

Next week, I’ll share pictures of the next step progress.  I will say that from the start of these pictures, through the one above took roughly 6 months.  It would have taken probably days, had we hired a crew of people to come out and do everything for us, but that isn’t the route we took.  Even though it’s much more time consuming, it really saved us a lot of money.